Skip to content
 cust@legendarchery.com
 302 503 5767
 Westfield IN 46074

Of all the small things that derail arrow groups, how you hold the bow is near the top of the list. Grip pressure — the amount and location of force your bow hand applies to the riser — directly influences where the bow wants to go at the moment of release. Too much squeeze, wrong pressure point, or inconsistent placement shot to shot will introduce torque before the arrow ever leaves the string. This guide breaks down the mechanics so you can make deliberate changes instead of guessing.
Why Grip Pressure Has Such a Big Impact on Accuracy
The bow reacts to whatever your hand is doing at the shot. If your fingers are wrapped tightly around the grip, they apply uneven lateral force to the riser. That force rotates the bow left or right — often only a millimeter or two — but at twenty or thirty meters, that tiny rotation translates into a meaningful miss. This is torque, and it is almost invisible to the naked eye during a shot.
The more shots you fire with inconsistent hand pressure, the more your groups will scatter in a pattern that looks like a wind problem or a sight issue, when the real cause is your hand. Identifying grip-induced torque early saves a lot of time chasing phantom equipment problems.
Core Principles of Correct Bow Hand Pressure
The Pressure Point: Thenar Eminence
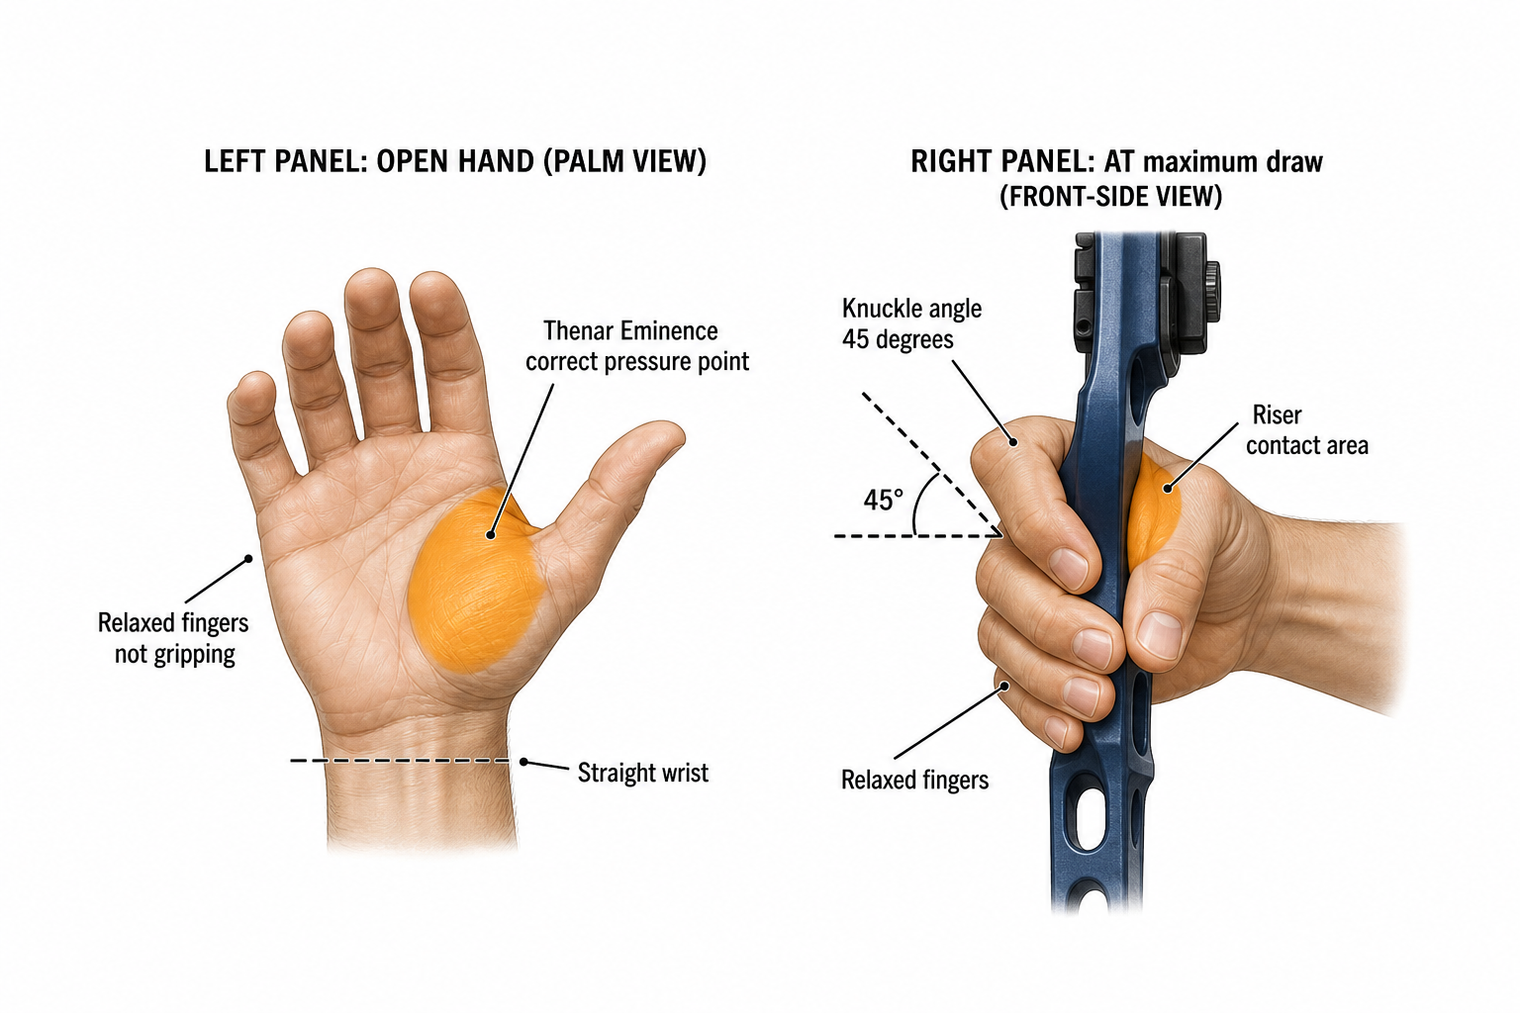
The correct contact point for virtually all styles — recurve, compound, traditional — is the thenar eminence, the fleshy pad at the base of your thumb on the palm side. This is the thickest, most stable part of the hand. Pressure concentrated here pushes the bow straight forward, which is exactly what you want at full draw and through the clicker or release.
When you position the bow correctly against this pad, the remaining fingers naturally relax. They are not gripping; they are simply present. Think of the bow sitting in the hand rather than being held by it.
Finger Position and Tension
A common cue used by coaches is to imagine holding a small, fragile object — something you do not want to crush. Your fingers curl loosely, your thumb points generally forward or slightly downward, and nothing is white-knuckled. Excessive tension in the bottom three fingers is one of the fastest ways to introduce left-right torque because those fingers torque the lower limb as the bow moves forward through the shot.
For recurve archers especially, understanding the dished grip geometry helps here. A dished grip is designed to guide your hand into that correct thenar contact automatically, reducing the chance of palm-flat contact that spreads pressure across the whole hand.
Knuckle Angle as a Consistency Check
Many coaches recommend setting the knuckles of the bow hand at roughly 45 degrees relative to the ground at full draw. This angle helps keep the heel of the hand engaged while allowing the fingers to stay loose. It is also a repeatable reference point — if you photograph your hand at full draw over multiple sessions and the knuckle angle drifts, your pressure placement is probably drifting too.
Wrist Position
A straight or slightly low wrist reduces the chance of the bowstring grazing your forearm and also keeps the bow hand from applying upward or downward force on the riser. A very high wrist tends to shift pressure toward the fingers, which re-introduces grip. A very low or broken wrist can shift pressure toward the thumb side in a way that is hard to control consistently.
Practical Guidance for Building Better Grip Habits
- Draw and check before anchoring. Before you reach full draw, consciously feel where the bow is sitting in your hand. If you have already anchored and the pressure feels wrong, let down. Do not push through a bad setup.
- Use a sling. A bow sling — wrist or finger style — removes the psychological urge to grab the bow at the shot. Knowing the bow will not fall lets your hand stay relaxed. This is one of the most practical tools for breaking a grip habit.
- Shadow draw in a mirror. Set up a mirror at head height and watch your bow hand from the front as you draw. You will see torque-inducing rotation you cannot feel in the moment.
- Blank bale work at close range. Shoot at a blank target two to three meters away with no aiming pressure. With zero focus on the target, your attention goes entirely to the process, including your hand. Pressure issues become obvious.
- Mark your grip hand. Use a pen or chalk to mark the thenar eminence before a session. Check the bow after twenty shots — where is the mark wearing? This tells you exactly where contact is happening.
If you are still working out which style of bow grip suits your shooting style, experimenting with different grip shapes on the riser can make correct hand placement significantly easier.
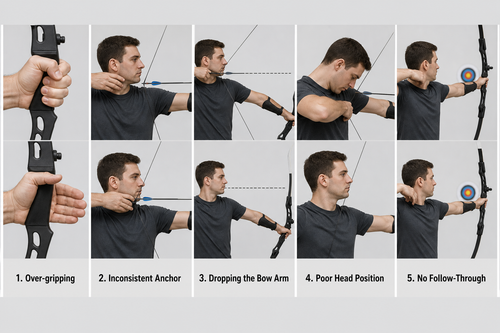
Common Grip Pressure Mistakes
- Full hand contact. Pressing the entire palm flat against the grip distributes pressure unevenly and makes shot-to-shot consistency almost impossible.
- Death grip. Squeezing tightly throughout the draw and release locks muscle tension into the shot and causes the bow to jump unpredictably at the break.
- Pushing with the thumb. Some archers unconsciously push forward with the thumb tip rather than the thenar pad. This shifts the bow slightly offline and often moves the wrist into a high position.
- Dropping the bow hand early. Anticipating the shot causes some archers to relax grip pressure before the arrow clears the rest. The bow moves, the arrow follows. This shows up as low and inconsistent shots.
- Inconsistent placement session to session. Grip pressure that works one day and is slightly different the next is arguably worse than a consistently wrong grip, because it makes diagnosing groups nearly impossible.
- Ignoring the bow hand while fixing the draw hand. Archers troubleshooting string hand issues often introduce compensating grip changes without realising it. Work on one thing at a time and verify both hands with video.
Recurve vs. Compound: Does the Approach Differ?
The fundamental principle — relaxed hand, thenar contact, no torque — applies across both disciplines. However, the practical feel can differ. Compound archers using a wrist-strap release often have more forgiving timing on the shot, but grip torque still affects groups, particularly at longer distances. Recurve archers shooting off the finger tend to have less margin because the shot cycle is more dynamic and the bow moves through a longer arc after release.
Barebow archers face a similar challenge to recurve shooters, and many traditional archers who shoot instinctively find that a relaxed, consistent grip also contributes to their natural point-of-aim process because the bow tracks predictably after the shot.
Frequently Asked Questions
What exactly is grip pressure and why do archers talk about it so much?
Grip pressure refers to how much force your bow hand applies to the riser and, more importantly, where that force is concentrated. It gets attention because even small inconsistencies in hand pressure introduce torque at the shot — a rotational force on the riser that redirects the arrow before it has left the bow. Archers talk about it because it is responsible for a surprising amount of unexplained group scatter.
Why do my arrows keep going left even though my sight looks right?
For a right-handed archer, consistent left hits often indicate the bow is torquing left at the shot, which is typically caused by finger pressure on the left side of the grip. Check whether your fingers are applying lateral force on the riser by shooting with a looser, more open hand and seeing whether the pattern shifts. This is one of the first places to look before adjusting your sight.
What mistakes do beginners usually make with their bow hand grip?
The most common beginner mistake is gripping the bow like a hammer — wrapping all four fingers around the grip and squeezing through the shot. This feels natural and secure but it almost always introduces torque. The second most common issue is inconsistency: holding differently each shot without a reliable reference point like knuckle angle or thenar placement.
How long does it take to correct a grip habit?
It depends on how long the habit has been there. A pattern built over years of shooting can take several weeks of deliberate blank bale practice before it starts to feel natural. Short, focused sessions are more effective than long sessions where fatigue causes the old habit to creep back in. Using a bow sling from the start of the correction process tends to speed things up significantly.
Conclusion
Grip pressure rewards the archers who take time to understand it. Once you have identified your contact point, built a consistent knuckle angle reference, and removed the urge to grab the bow at the shot, your groups will tighten in a way that no sight adjustment could have achieved. Start with blank bale work, use a sling, and check your hand with video regularly — the feedback loop is the fastest route to a genuinely relaxed and repeatable bow hand.