Skip to content
 cust@legendarchery.com
 302 503 5767
 Westfield IN 46074


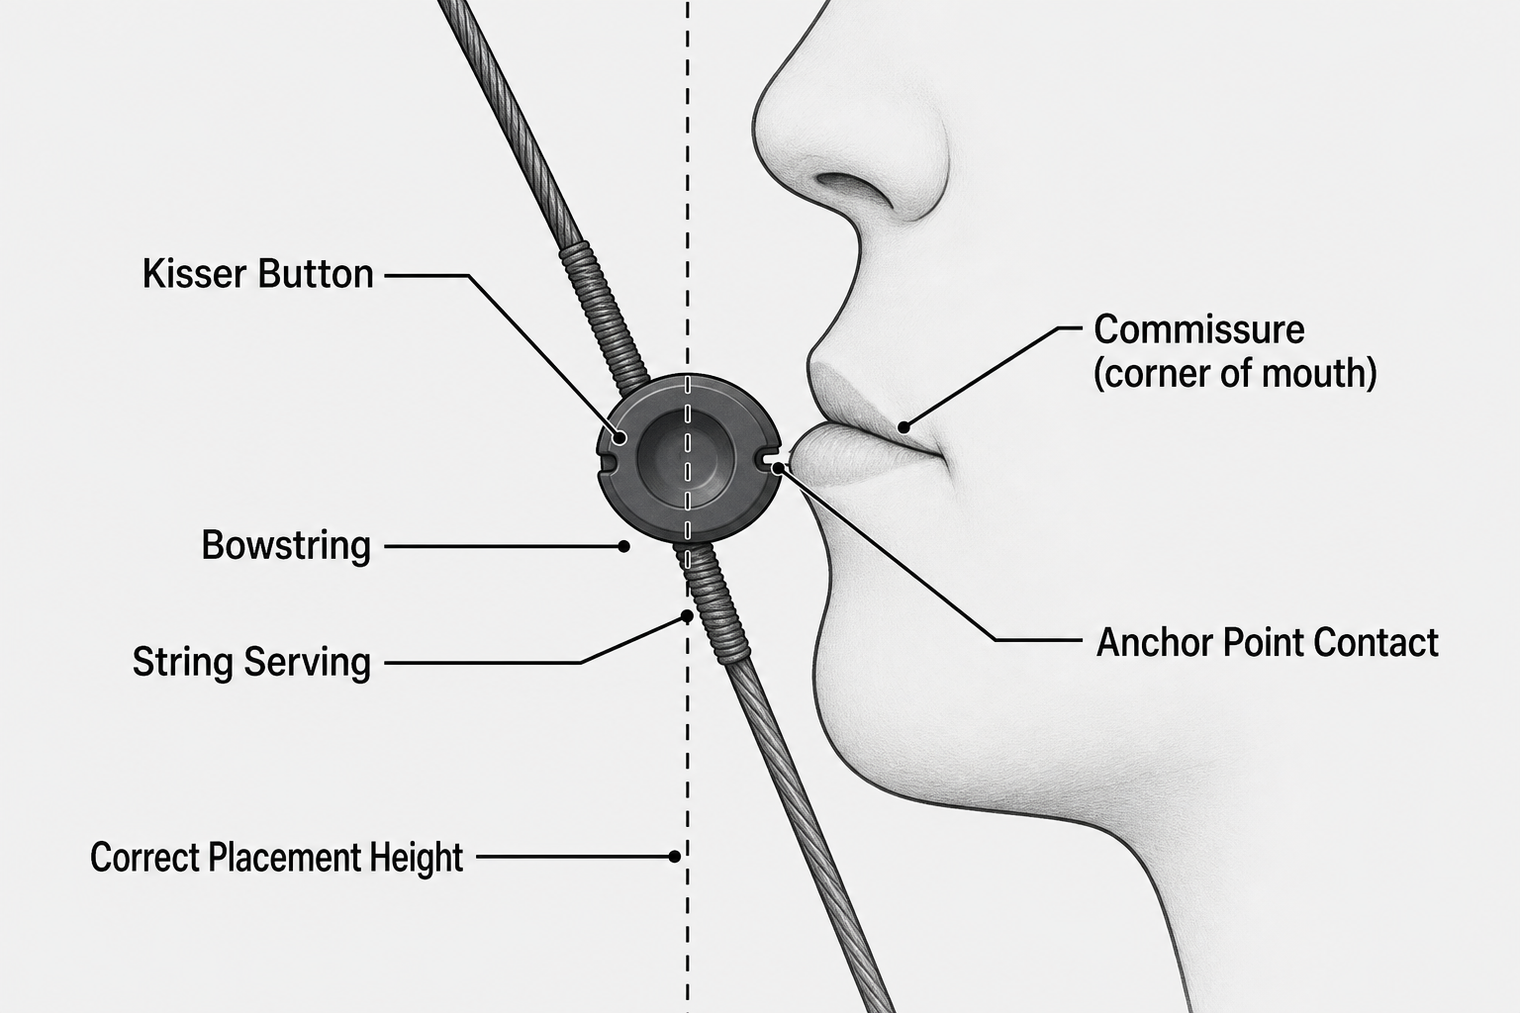
A kisser button is a small disc or nock that sits on the bowstring and touches the corner of your mouth at full draw. When positioned correctly, it gives you a reliable tactile reference point every single shot. Get the placement wrong by even a few millimetres, and it stops doing its job entirely. Here is how to set it up properly from the start.
What a Kisser Button Actually Does
Before adjusting anything, it helps to understand the role this small accessory plays. At full draw, most archers use a combination of visual and tactile cues to find their anchor point — the consistent position where the drawing hand meets the face. A peep sight handles the visual side. The kiss button handles the tactile side by confirming vertical anchor position.
If your anchor drifts even slightly up or down between shots, your point of impact shifts accordingly. A properly placed kisser button makes that vertical drift immediately noticeable because the contact with your lips changes. It does not replace good form — it reinforces it.
Core Principles of Correct Placement
There are a few non-negotiable principles that apply regardless of the bow type or the archer's experience level.
The Contact Point Must Be Consistent
The button should touch the corner of your mouth — specifically the commissure, the point where your lips meet — at full draw. This spot is less prone to variation than the centre of the lips and gives a more reliable feel. Some archers prefer contact with the lower lip, and that can work too, but whatever spot you choose, it must be the same spot every draw.
Height Is Set at Full Draw, Not at Rest
This is where many beginners go wrong. The kisser button must be positioned on the string while the archer is at full draw with a proper, repeatable anchor. Do not eyeball it while the bow is undrawn. The string angle changes significantly between rest and full draw, and a position that looks right at rest will likely be off when it matters.
The Button Should Sit Snugly Without Gripping
Once placed, the disc should stay put through normal shooting without sliding. Most kisser buttons use a friction fit or a small locking mechanism. The goal is that it holds position reliably but can still be adjusted with a purpose tool or deliberate effort if your setup changes.
Step-by-Step Placement Process
Follow this process to set the position accurately the first time.
- Establish your anchor point first. Before touching the kisser button, spend time confirming your anchor is consistent — hand position under the jaw, thumb to neck, string to nose or cheek. The kisser button is set to match your anchor, not the other way around.
- Draw to your natural anchor with a helper or a mirror. Having a second person watch or using a mirror to check form reduces guesswork significantly.
- Mark the string at full draw. While holding at full draw, have a helper mark the string at the corner of your mouth with a felt-tip pen or masking tape. This gives you a starting point.
- Slide the button into position. With the bow relaxed, slide the kisser button to the marked location. Most buttons open along one edge to clip onto the string without needing to remove any hardware.
- Draw again and test the contact. Draw to your anchor and feel where the button touches. It should reach the target contact point cleanly without requiring you to adjust your head or mouth position to find it.
- Shoot a small group and check impact. If your form is consistent and the button placement is correct, your shots should group well. If you find yourself hunting for the button or altering your head tilt, adjust the height slightly and retest.
Common Mistakes with Kisser Button Setup
Even experienced archers make errors when setting or resetting this accessory. These are the ones worth watching for.
- Setting it while the bow is undrawn. The string angle at rest bears no reliable relationship to the angle at full draw. Always set position under realistic draw conditions.
- Chasing the button with your face. If you tilt or crane your head to find the button, you have introduced a new inconsistency rather than removing one. The button should come to you, not the other way around.
- Not accounting for peep sight interaction. If you also use a peep sight, both reference points must align simultaneously at your natural anchor. Set your peep first, then fit the kisser button to match.
- Using the wrong button size. Buttons come in different diameters. A button that is too large can drag on the lips or interfere with clean release. A button that is too small may be hard to feel reliably. Match the size to your preference and string setup.
- Forgetting to recheck after changing draw length. Any change to draw length — new cams, cable adjustment, different D-loop — changes the string angle at full draw. The kisser button position needs to be verified and likely adjusted after any such change.
- Placing it on a serving that is worn or inconsistent. If the string serving is damaged or uneven where the button sits, it will not hold reliably. Check the serving condition before setting the button.
Kisser Button vs. Other Anchor Reference Aids
A kisser button is one of several ways archers reinforce a consistent anchor. It is worth knowing where it fits relative to alternatives.
A peep sight provides a visual reference — you align the peep with your sight housing or pin at full draw. It confirms horizontal and vertical alignment of the eye relative to the string. The kisser button confirms where the string sits relative to the face. Used together, they cover both tactile and visual anchor confirmation, which is why many compound archers run both simultaneously.
Some archers use a nose button instead — a small soft piece that contacts the bridge or tip of the nose. This is common in traditional shooting where face contact with the string is normal. Kisser buttons are generally more common on compound setups because the string does not typically touch the face in the same way.
If you are also using a bowstring brush button to keep brush and debris off the string, make sure the two buttons do not conflict in their placement along the string.
When to Adjust or Remove the Button
Not every archer benefits from a kisser button at every stage. Some situations where adjustment or removal makes sense:
- After a significant form change, such as shifting from a high anchor to a low anchor position.
- When switching between bows with meaningfully different draw lengths or geometries.
- If the button creates lip interference that affects your release or causes flinching.
- During competition where specific equipment rules apply — always verify that your class permits the accessory.
Frequently Asked Questions
What exactly is a kisser button and where does it go?
A kisser button is a small plastic or rubber disc attached to the bowstring that touches a fixed point on your face — usually the corner of the mouth — at full draw. Its purpose is to give you a repeatable tactile reference that confirms you have reached your anchor point consistently. Kisser button placement refers to the exact position along the string where the button is set so that this contact happens correctly at full draw.
Why does getting the placement right actually matter?
If the button is too high or too low on the string, it either fails to make contact at your anchor or forces you to alter your head position to find it. Either outcome introduces inconsistency that no amount of sight adjustment can reliably correct. Accurate placement means the button arrives at your face naturally and confirms correct anchor without any conscious searching.
What mistakes do beginners most often make?
The two most common beginner errors are setting the button while the bow is at rest rather than at full draw, and adjusting face position to find the button instead of letting it come to them. Both problems create a false sense of consistency while actually building in a source of variation.
How do I know if my current placement is off?
Signs that your placement needs attention include: inconsistent grouping that cannot be traced to sight or release issues, needing to tilt or drop your head to feel the button, or finding that you sometimes feel contact and sometimes do not within the same session. Drawing to anchor in front of a mirror or having a coach observe your draw cycle can help diagnose whether the button is doing its job.
Final Thoughts
A kisser button is a simple tool, but its value depends entirely on being set in the right position relative to your established anchor. Take the time to confirm your anchor first, set the button at full draw, and verify with real shots rather than guesswork. When it is right, you will barely notice it — and that is exactly the point.