Skip to content
 cust@legendarchery.com
 302 503 5767
 Westfield IN 46074


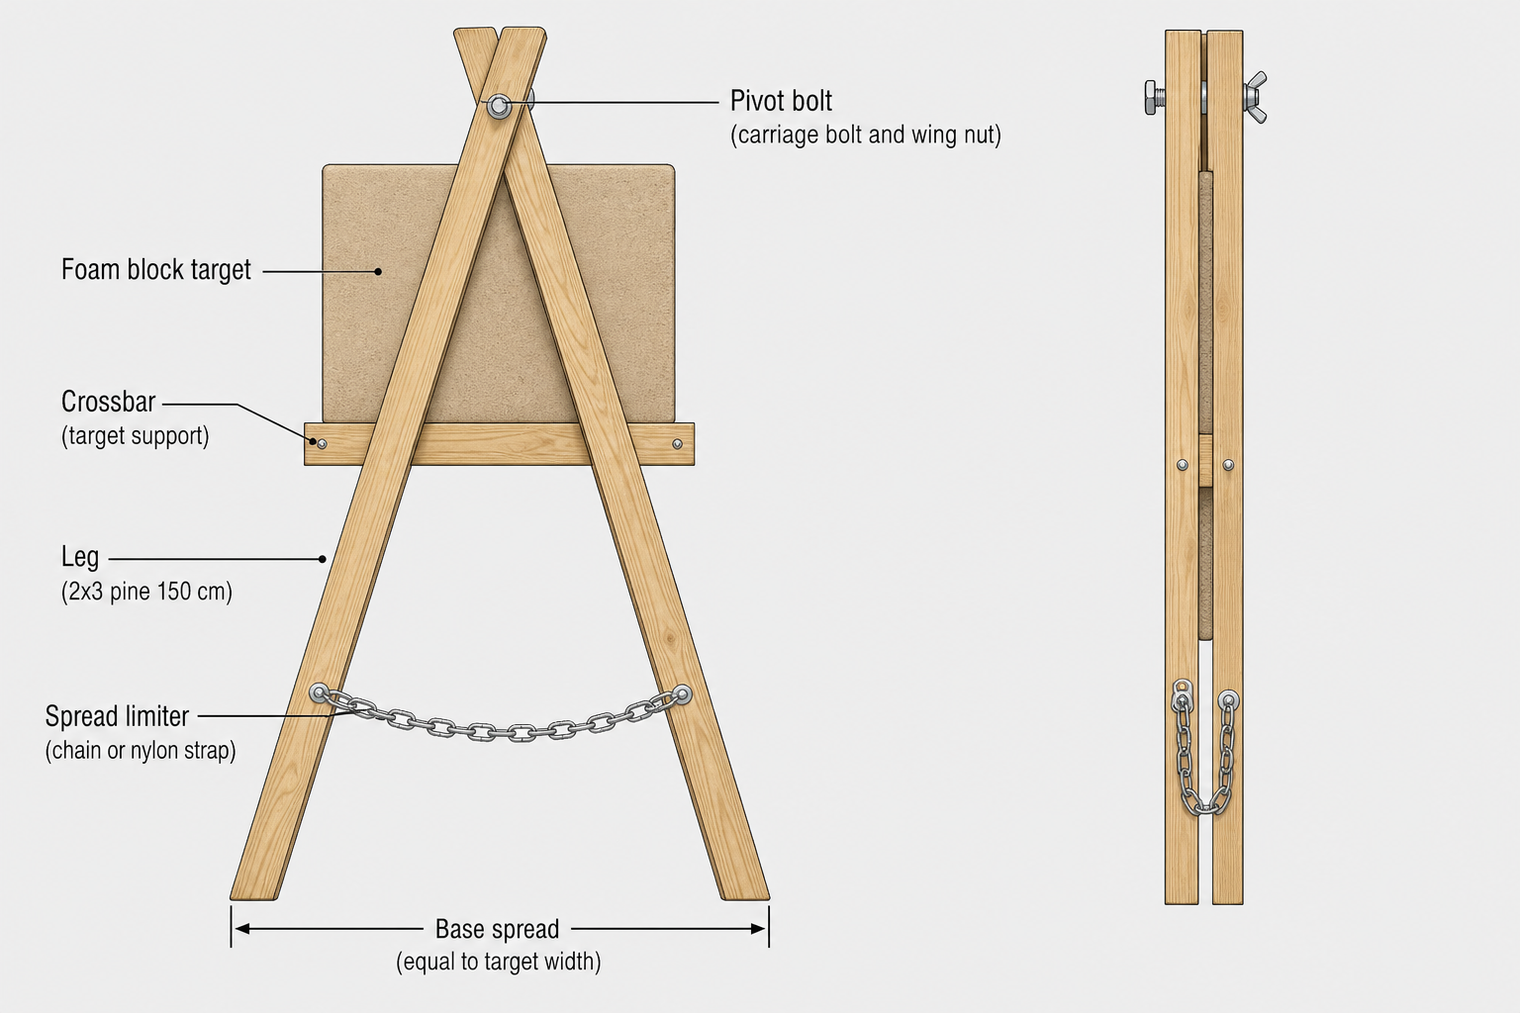
A solid target stand is one of those things you only appreciate after a bad one collapses mid-session. If you shoot regularly in the backyard or travel to informal ranges, building your own DIY folding archery target stands is a practical, cost-effective option — provided you get the fundamentals right. This guide walks through the key design principles, material choices, and real-world mistakes that trip up first-time builders.
Why a Folding Design Makes Sense for Most Archers
Fixed target stands are fine if you shoot in one dedicated location and never need to move your setup. For everyone else, a folding design earns its keep quickly. It packs flat for transport, fits in a car boot or garage corner, and can be assembled without tools in under two minutes once you have a working build.
The portability factor also matters for safety. A stand that folds flat can be stored properly between sessions, reducing the risk of children or pets interacting with an unsecured target. For archers who compete at club events or travel to field courses, a compact stand removes the need to rely on whatever the venue has available.
Core Design Principles to Get Right First
Before you buy materials or sketch a plan, understanding a few structural principles will save you from building something that wobbles, tips, or damages your target over time.
Weight Distribution and Footprint
The most common reason homemade stands tip over is a footprint that is too narrow for the target weight. A general rule: the base width should be at least equal to the width of the target itself. For a standard 60 cm foam target, that means legs spreading at least 60 cm apart at the base. For heavier bag targets, go wider.
The A-frame is the most reliable geometry for a foldable build. Two angled legs connected by a crossbar at the top, with a rear support brace or a rope limiter to control how far the legs spread. This design keeps the centre of gravity low and distributes arrow impact forces evenly.
Material Selection
- Timber (2x4 or 2x3 pine): The most accessible option. Easy to cut, cheap, and strong enough for targets up to around 15 kg. The main trade-off is weight — a full timber A-frame is not ultra-light.
- Aluminium square tube: Lighter than timber, weather-resistant, and surprisingly rigid when bolted correctly. More expensive and requires basic metalworking or a good hacksaw and file.
- PVC conduit (heavy wall): Very light and cheap, but only suitable for foam faces and lighter targets. Standard PVC will crack in cold weather under repeated arrow impact vibration.
- Electrical conduit (steel EMT): A middle-ground option — lightweight, strong, and bendable with a basic conduit bender. Connectors and T-fittings make assembly modular.
Pivot and Fold Mechanism
For timber builds, a single carriage bolt through both legs at the top creates a clean pivot. Add a wing nut and you can adjust the spread angle on the fly. A short length of chain or nylon webbing between the lower legs acts as a spread limiter — this stops the stand from collapsing outward under the target's weight.
For metal tube builds, pipe flanges or purpose-made hinge brackets give a cleaner result. Avoid relying solely on friction fittings for the pivot point; they loosen over time and the stand becomes unpredictable.
Practical Build Guidance: A Simple Timber A-Frame
This is the most proven design for archers building their first stand. It suits foam block targets, layered foam faces, and lighter bag targets.
- Materials needed: Two lengths of 2x3 pine at 150 cm each, one crossbar at 60 cm, one carriage bolt (M10, 80 mm), two washers, one wing nut, 50 cm of chain or webbing, two S-hooks or carabiners.
- Step 1: Cut the two main legs to 150 cm. Round or chamfer the top ends so they sit flush when crossed.
- Step 2: Mark a point 20 cm from the top of each leg. This is your pivot point. Drill a clearance hole for the carriage bolt through both legs together to ensure alignment.
- Step 3: Bolt the legs together at the pivot point. Do not overtighten — the legs need to rotate freely.
- Step 4: Attach the chain or webbing between the lower sections of each leg using S-hooks. Set the spread so the base is approximately as wide as your target.
- Step 5: Cut and attach the crossbar near the top to support the target face. A simple notch or a small timber cleat on each leg holds the bar in place without fasteners, making disassembly fast.
If you shoot heavier targets, add a second crossbar lower on the frame and use a larger base spread. For outdoor use, treat the timber with an exterior wood sealant to prevent warping in wet conditions.
If you want to compare your build against professionally manufactured options, it is worth looking at what commercial archery target stands offer in terms of materials and adjustability — it can give you useful benchmarks for your own design.
Matching the Stand to Your Target Type
Not all targets interact with a stand the same way. A compressed foam block sits cleanly on a flat crossbar. A bag target is heavier and tends to sway on impact, putting more lateral stress on the frame. Layered foam face targets are light but need a secure hanging point rather than a rest shelf.
Before finalising your stand dimensions, decide which archery target type you will use most. That single decision affects leg spread, crossbar height, and whether you need a hook or a shelf at the top of the frame.
Common Mistakes When Building DIY Target Stands
- Too narrow a base: The stand looks proportional in the workshop but tips as soon as a heavy target is hung. Always measure base width against target width before cutting.
- No spread limiter: Without a chain or strap between the legs, the stand will slowly splay wider each time it is set up, eventually collapsing. This is the single most common failure point.
- Using green or wet timber: Unseasoned wood warps as it dries, and a warped leg creates uneven ground contact. Buy kiln-dried or seasoned timber for any outdoor build.
- Ignoring arrow pass-through: If you shoot with a powerful recurve or compound bow and use foam targets, arrows can occasionally pass through. Build the stand so that a pass-through arrow does not hit the frame hardware and deflect dangerously.
- Over-engineering the fold mechanism: Complicated locking systems that require tools to operate defeat the purpose of a folding stand. Keep the mechanism to a single bolt and a spread limiter.
- Building for one target size: A stand that only fits your current target forces you to rebuild if you upgrade. Design with adjustability in mind from the start — slotted bolt holes or adjustable crossbar positions cost almost nothing extra.
Frequently Asked Questions
What exactly is a folding archery target stand and when does building one make sense?
A folding target stand is a portable frame designed to hold an archery target at a consistent height and angle during practice. Building one yourself makes practical sense when you need portability, shoot at multiple locations, or want a setup that stores flat in a small space. It becomes less necessary if you have a fixed outdoor range and do not move your equipment.
Why does the stand design matter more than most archers expect?
A poorly designed stand does not just fall over — it can let a target shift mid-session, creating inconsistent aiming references, or worse, cause an arrow deflection if the stand collapses at the moment of impact. Stability and correct target height directly affect your form development, especially for newer archers who are building muscle memory.
What are the most common beginner mistakes when making a homemade target stand?
The most frequent errors are building with too narrow a base, skipping the spread limiter between the legs, using low-quality or damp timber, and making the assembly too complicated to fold quickly. Most of these are easy to avoid if you plan the dimensions before cutting rather than adjusting as you go.
How do you improve a stand that already wobbles or feels unstable?
First, check whether the legs are making even contact with the ground — uneven legs are a common cause of wobble. If the legs are fine, widen the base spread and shorten the spread limiter. Adding rubber feet or small timber pads to the base of each leg also reduces movement on hard or uneven surfaces. If the pivot bolt is loose, replace the wing nut with a nylon-insert lock nut tightened to the point where rotation is firm but still possible.
Final Thoughts
A well-built folding stand takes a few hours to construct and will outlast several seasons of regular shooting. Focus on base width, a reliable pivot, and a simple spread limiter — those three elements determine whether your stand works consistently or frustrates you every session. Once the design is sound, the rest is just material choice and finishing detail. If you want to explore what purpose-built options look like alongside your DIY build, Legend Archery carries a range of outdoor archery supplies that may complement your setup.