Skip to content
 cust@legendarchery.com
 302 503 5767
 Westfield IN 46074


Who This Guide Is For
If you've just picked up a recurve bow or you've been shooting for a few months but your groups are still all over the place, this guide is for you. Aiming a recurve bow is genuinely different from aiming a compound bow or a firearm. The technique involves your whole body, not just your eyes. This article walks through the process in plain terms, from the equipment you need before you draw to how you diagnose problems after the shot.
Why Aiming a Recurve Bow Is a Skill in Itself
A recurve bow has less built-in mechanical assistance than a compound. There's no let-off, no peep sight, and often no wrist-mounted rest to fall back on. What that means in practice is that your hold, your anchor, and your sight picture all have to work together consistently for your arrows to land in the same place twice in a row.
Most beginner accuracy problems come from one of three sources: an inconsistent anchor point, an unclear aiming reference, or flinching through the release. Understanding which of these is affecting your shooting is half the battle. The other half is drilling the correct habits until they become automatic.
[product-tabs]
What You Need Before You Start
You don't need expensive equipment to learn good aiming technique, but a few basics will make the process much faster.
- A correctly drawn bow: Your bow's draw weight should match your current strength level. If you're straining to hold at full draw, you cannot aim properly. Most beginners start between 20 and 30 lbs.
- Matched arrows: Arrows that are too stiff or too weak for your bow will fly unpredictably regardless of how well you aim. Arrow spine should be matched to your draw length and bow weight.
- A bow sight or a clear aiming strategy: You can aim with a pin sight, a recurve-specific single-pin sight, or instinctively using the arrow tip as a reference. Beginners almost always benefit from starting with a sight.
- An arrow rest: A simple stick-on rest or a basic elevated rest keeps your arrow in a repeatable position on the shelf.
- A consistent shooting position: Work on a level surface with a clear target at a short distance, 5 to 10 metres, while you're learning.
If you're still choosing your equipment, the recurve bow range at Legend Archery covers options for all skill levels, from entry-level setups to more refined intermediate builds.
How to Aim a Recurve Bow: Step by Step
Step 1 – Build a Stable Stance
Stand perpendicular to the target with your feet shoulder-width apart. Your body should be side-on, with the shoulder of your bow arm pointing roughly toward the target. A square stance works well for beginners because it's easy to replicate shot to shot. Keep your weight evenly distributed and your knees relaxed, not locked.
Step 2 – Grip the Bow Correctly
A tense grip is one of the most common causes of arrows drifting left or right (for right-handed archers). The bow handle should sit against the pad of your thumb, not in the centre of your palm. Your fingers should be relaxed. If you're white-knuckling the grip, the bow will torque on release.
Step 3 – Hook and Set Your Draw Hand
Use a Mediterranean draw: three fingers under or two fingers under and one above the nocking point, with the string sitting in the first groove of each finger. Your draw elbow should be at roughly the same height as your draw shoulder and travelling back, not upward, during the draw.
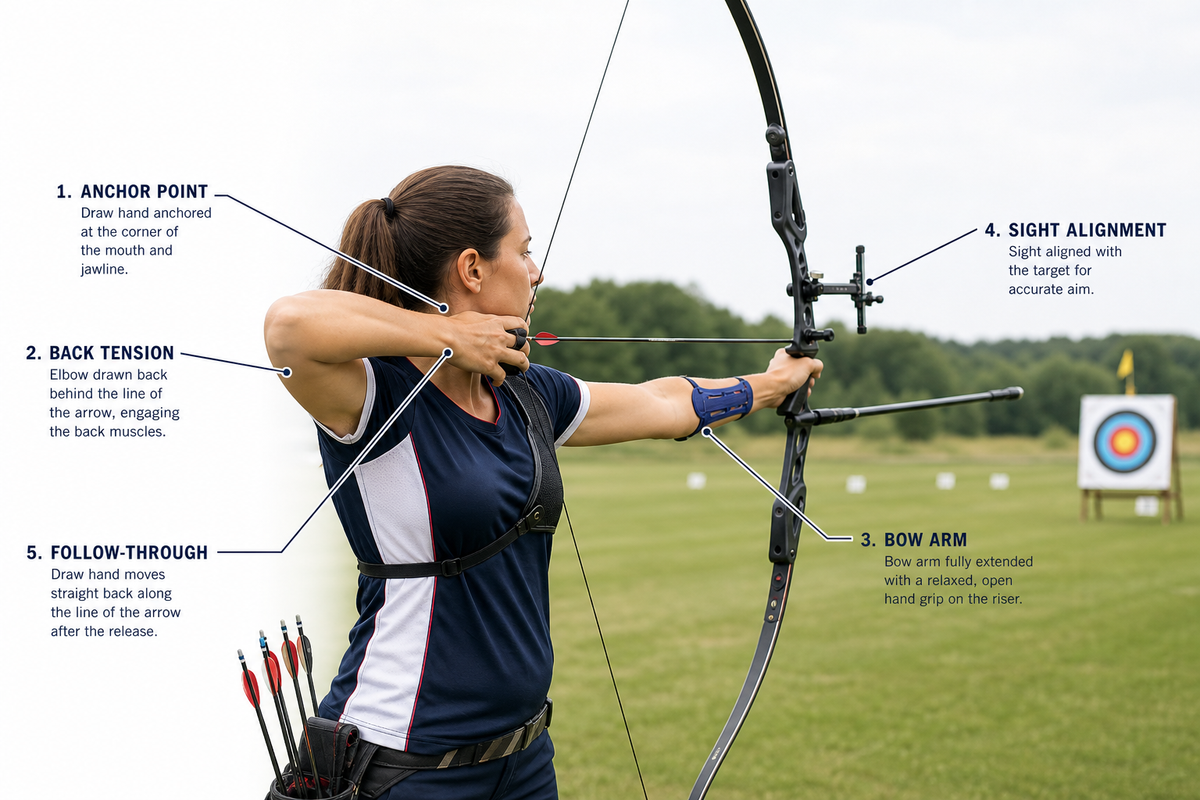
Step 4 – Establish Your Anchor Point
The anchor point is the most critical variable in consistent aiming. Every single shot, the string or your draw hand must touch the same part of your face in the same way. Common anchor references include:
- String touching the tip of your nose
- Thumb knuckle touching the jaw or ear lobe
- Index finger touching the corner of the mouth
Use at least two contact points so you can feel when something is off. If your anchor changes by even a few millimetres, your point of impact will shift noticeably, especially at distance.
Step 5 – Align Your Sight Picture
With a sight: Once anchored, close your non-dominant eye or use both eyes open (whichever gives you a cleaner picture) and place the pin on the centre of the target. The pin should appear to sit on top of the gold, not obscure it.
Instinctive or tip-of-arrow aiming: Focus hard on the target, not the arrow, and allow your subconscious to reference the arrow tip. This takes significantly more practice to develop but is the foundation of traditional barebow shooting. If you're exploring a more traditional approach, take a look at the traditional recurve bow options at Legend Archery to understand which setups suit this style.
Step 6 – Hold, Breathe, and Execute the Release
Take a breath in as you draw, let half of it out, and hold. Your body should feel under tension but controlled. Then focus entirely on the target and let the release happen as a result of your back muscles continuing to draw through the shot. Do not consciously open your fingers. The release should feel like a surprise, not a decision.
After the arrow leaves, hold your bow arm up until the arrow hits the target. This follow-through prevents you from dropping the bow early, which disturbs the arrow's path.
Common Mistakes to Avoid
- Peeking: Moving your head to watch the arrow in flight. This almost always happens just before release and pulls your bow off the line.
- Plucking the string: Yanking your draw hand outward instead of allowing it to travel straight back along your jaw. This introduces a side force on the arrow at the moment of release.
- Aiming too long: Holding at full draw for more than a few seconds causes muscle fatigue and your aim will start to wander. If you're not ready, let down and start again.
- Inconsistent anchor: Rushing to get the sight on target without checking your anchor first. The order matters: anchor, then aim.
- Gripping the bow too hard: Especially common when archers are nervous or fatigued. A tight grip rotates the bow and sends arrows off to one side.
- Standing too close to begin with: Shooting at too long a distance before your form is solid. Start at 5 metres and only move back when you're hitting consistent groups, not just occasionally hitting the gold.
How to Check Whether Your Aiming Is Working
The clearest indicator of good technique is a tight group, even if that group isn't in the centre of the target yet. A tight group tells you your form is consistent, and a simple sight adjustment will move the whole group where you want it. A scattered pattern suggests a form problem, not a sight problem.
Use these checks to identify what's going wrong:
- Arrows all landing left or right: Usually a torque issue with the grip, or the bow is not aligned to the target during the draw.
- Arrows all landing high or low: Anchor point inconsistency or the sight needs adjustment.
- Completely random scatter: Multiple issues at once, typically anchor, grip, and release all varying. Go back to short range and shoot slowly.
- Good groups at short range but not at distance: Your form is mostly sound but small errors are being magnified by the additional flight time. Distance is the most honest test of technique.
Video yourself from the side and from behind. Small flaws in anchor and release are nearly impossible to feel but are easy to see on footage. A coach or experienced training partner can also catch things you'll miss on your own.
Frequently Asked Questions
How do you actually aim a recurve bow correctly?
Correct aiming starts before you look at the target. Establish a firm, repeatable anchor point first, then align your sight or arrow tip with the target. Focus on the target rather than the sight pin, and let the release happen as a result of continued back tension rather than a deliberate hand opening. Consistent results come from consistent process, not from trying harder to hit the bullseye.
What mistakes cause the most problems for beginners?
The most damaging habits are an inconsistent anchor point, gripping the bow handle too tightly, and moving the bow arm before the arrow has cleared. Any one of these will produce scattered groups regardless of how carefully you're looking at the target. Fix the anchor first, then the grip, then work on follow-through.
Do you need a sight to aim a recurve bow?
No, but a sight makes the learning process faster and more measurable for most beginners. Instinctive aiming is a valid and traditional approach, but it requires significantly more repetition before it becomes reliable. Starting with a simple pin sight lets you separate form problems from aiming reference problems more easily.
How can you tell if your aiming technique is actually improving?
Watch your group size rather than where the group lands. If your arrows are landing closer together over time, your aiming and form are improving even if you still need to adjust your sight. Improvement in group size is more meaningful than occasional bullseyes surrounded by misses.
Conclusion
Good recurve aiming technique is built from the ground up: stance, grip, anchor, sight picture, and release all feed into each other. Focus on making each element consistent before worrying about where the arrow lands. Once your process is repeatable, accuracy follows naturally. If you're still selecting your setup, browsing the recurve bow range at Legend Archery is a practical next step.