Skip to content
 cust@legendarchery.com
 302 503 5767
 Westfield IN 46074

A poorly shaped grip is one of the most overlooked causes of inconsistent arrow flight. If your bow's handle doesn't fit your hand naturally, you're fighting tension on every shot. This guide explains how to make a custom recurve grip that suits your hand shape, shooting style, and draw technique — whether you're building one from a blank or reshaping an existing riser handle.
Why a Custom Grip Actually Matters
Most production risers ship with a grip that fits a general hand size. For many archers, especially those with smaller or larger hands, a high-wrist or low-wrist shooting style, or specific medical considerations like joint issues, the stock grip creates unwanted contact pressure, torque, or fatigue.
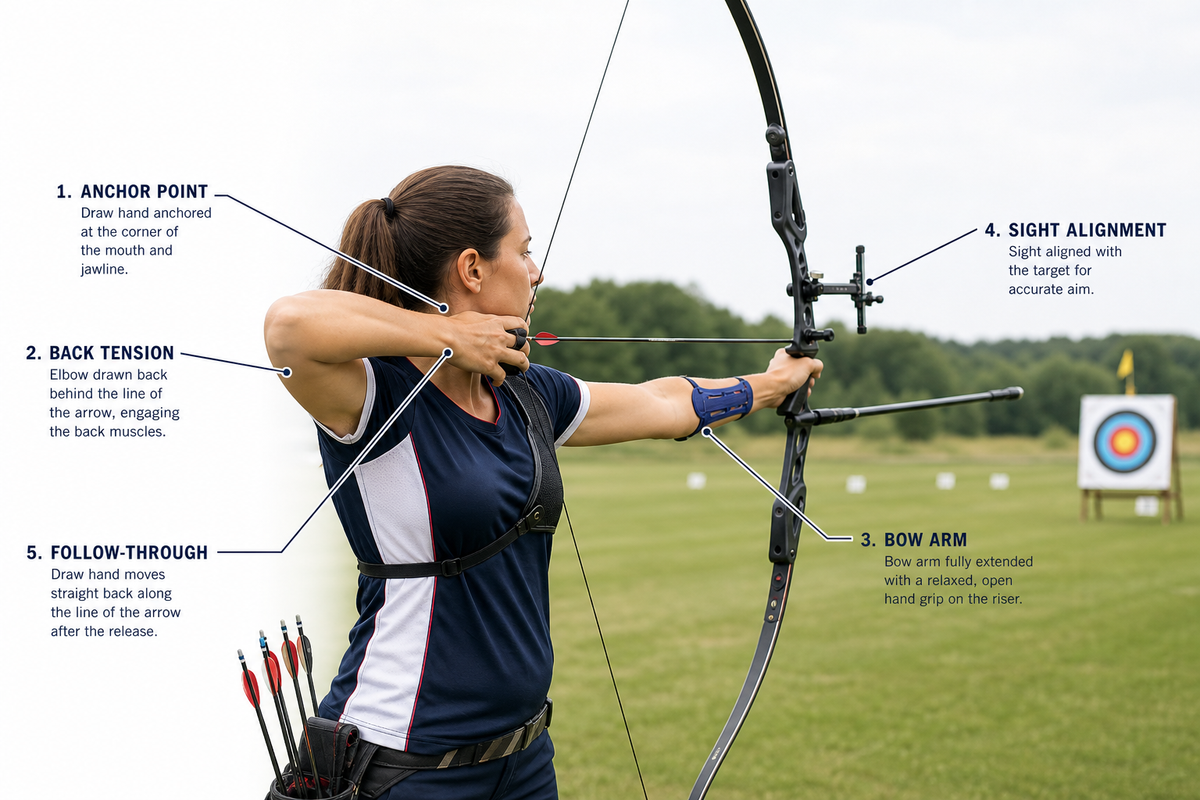
A properly fitted grip encourages a relaxed, consistent bow hand position on every shot. That means less torque transferred to the riser, more repeatable string clearance, and tighter groups over time. For recurve archers who shoot regularly, this isn't a luxury — it's a meaningful performance variable.
What You Need Before You Start
Before picking up a tool, gather everything you'll need. Stopping mid-project to hunt for sandpaper or clamps is a fast way to make avoidable errors.
- Grip blank or stock grip: Hardwoods like maple, walnut, or cherry work well. Avoid soft or resinous woods that compress unevenly.
- Rasps and files: A half-round rasp for rough shaping, a fine-cut file for detail work.
- Sandpaper: 80-grit through to 220-grit minimum. Some archers finish to 400-grit for a sealed surface.
- A sharp marking knife or pencil: For tracing your hand position and centerline.
- Wood finish: Linseed oil, tung oil, or a wax-based finish. Avoid anything that builds up a thick, slippery film.
- Calipers or a contour gauge: Useful for measuring symmetry across both sides of the grip.
- Your riser or a dummy handle: The grip must be shaped while regularly test-fitting to your actual bow hand position.
- Clamps and a bench vise: A secure hold prevents slipping and uneven cuts.
If you're reshaping a grip that's already attached to a recurve bow riser, de-string the bow first and work off-bow whenever possible to avoid damaging surrounding components.
Step-by-Step: Shaping Your Custom Grip
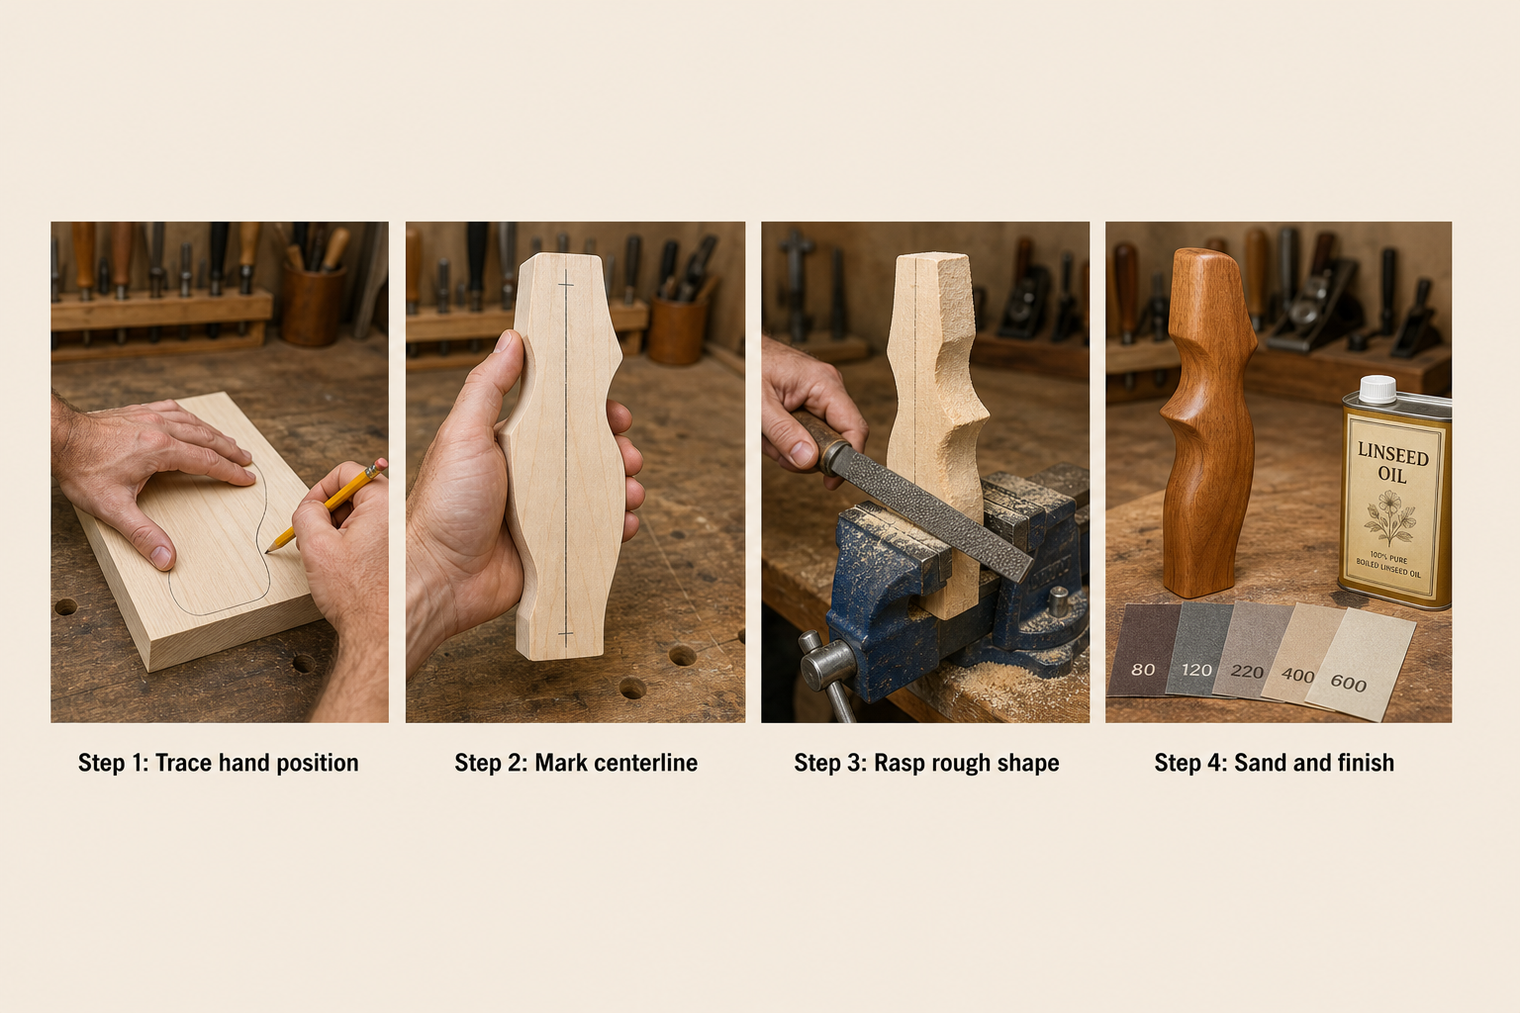
Step 1 — Trace Your Hand Position
Hold the riser in your natural bow hand position. Have someone trace the contact points of your palm and thumb pad onto the grip surface with a soft pencil. Mark where pressure concentrates — typically the thenar muscle (the pad below your thumb), the lifeline, and the area just below your middle finger. These marks guide your shaping.
Step 2 — Mark the Centerline
Draw a clear vertical centerline down the back of the grip. This is your reference throughout the entire shaping process. Losing the centerline is one of the most common reasons grips end up asymmetric and pull point of aim sideways.
Step 3 — Rough Shape with a Rasp
Secure the grip in a bench vise. Using your half-round rasp, begin removing material from the areas that sit away from your traced contact points. Work in long, even strokes. Remove material gradually — you can always take more off, but you can't put it back.
Focus first on the throat of the grip (the narrowest point your hand wraps around) and the shelf or platform where your thumb sits. Aim to create a surface that mirrors the natural arch of your palm when relaxed.
Step 4 — Test Fit Constantly
After every few minutes of rasping, pick up your bow and hold it in shooting position. Eyes closed helps — let your hand find its natural place. Check where pressure is still too high or where there are gaps. Mark these areas and return to the vise.
This test-fit cycle is the core of hand-fitting work. Archers who skip this step end up with a grip that looks good but still doesn't feel right.
Step 5 — Refine with Files and Medium Sandpaper
Once the rough shape is close, switch to a fine-cut file and 80-grit sandpaper. Blend any rasp marks and sharp transitions. Pay particular attention to the thumb shelf angle — this affects high-wrist versus low-wrist shooting position more than any other feature.
Step 6 — Progress Through Sandpaper Grits
Sand progressively through 120, 180, and 220 grit. Between each grit, wipe the grip with a damp cloth and let it dry. This raises the grain, shows any remaining tool marks, and allows you to sand them out before moving finer. Skipping grits leads to visible scratch patterns under finish.
Step 7 — Apply Finish
A penetrating oil finish like raw linseed oil or tung oil is the standard choice for bow grips. It seals the wood without creating a surface build-up that makes the grip feel slippery when your hand perspires. Apply a thin coat, wipe off the excess after 15–20 minutes, and allow it to cure fully before a second coat. Two to three coats is usually enough.
Avoid varnish or lacquer on grips. These build layers that can crack, peel, and change the feel of the surface over time.
Step 8 — Final Test and Micro-Adjustments
After the finish cures, do a full shooting session — or at minimum simulate your full draw cycle multiple times. Note any hotspots or pressure points. Light sanding with 220-grit, a fresh oil coat, and you're done.
Common Mistakes to Avoid
- Removing too much material too quickly: Rasp work is fast. Take passes, not chunks.
- Losing the centerline: Mark it in pen, not pencil, so you can see it through dust and shavings.
- Shaping to visual symmetry, not hand feel: Your hand isn't symmetric. The grip doesn't have to be either.
- Skipping the wet-sanding step between grits: This step reveals tool marks you can't see dry.
- Applying thick finish coats: Thick coats take longer to cure and often peel from high-contact surfaces.
- Not test-fitting until the end: Checking fit only once or twice leads to overcorrecting in the wrong places.
- Using the wrong wood: Softwoods compress and dent quickly under shooting pressure. Stick to hardwoods.
How to Check Your Result
A well-shaped grip should pass a few practical tests before you call it finished:
- Relaxed hold test: Close your eyes, pick up the bow, and let your hand settle naturally. The grip should feel like it disappears into your hand — no sharp edges, no points of excessive pressure.
- Torque check: Shoot five to ten arrows and look at your bow hand after each shot. If your wrist is consistently rotating the same direction at full draw or during the shot, the grip geometry is introducing torque. A neutral grip produces minimal movement at the wrist.
- String clearance check: With a light coat of foot powder or chalk on the inside of your forearm, shoot several arrows. If the string is consistently grazing the same spot, your hand position — and potentially the grip geometry — may be pulling the bow off vertical.
- Long session comfort: Shoot enough arrows that your hand fatigues slightly. Any hotspot will become obvious. Mark it and adjust.
Frequently Asked Questions
What's the right approach to shaping a recurve grip for the first time?
Start with more material than you need and remove it gradually. Trace your natural hand position before you begin, keep a clear centerline reference, and test-fit after every few minutes of rasping. The process is iterative — shape a little, feel it, shape a little more.
What are the most common mistakes people make when shaping their own grip?
Removing too much material too quickly is the biggest one. Others include losing the centerline, shaping for visual symmetry instead of hand feel, and skipping the wet-sanding step between grits. Not test-fitting throughout the process also leads to grips that look right but don't perform.
What tools do you actually need for this job?
A half-round rasp, a fine-cut file, sandpaper from 80 to 220 grit, a contour gauge or calipers, a bench vise, and a penetrating oil finish. You don't need power tools — all the meaningful shaping in bow grip work is done by hand.
How do you know if the grip you made is actually working?
The grip should feel neutral and disappear into your hand at full draw. Check for wrist torque after shots, confirm string clearance is consistent, and shoot enough arrows in one session to notice any hotspots. A grip that fits correctly requires no conscious effort to hold in the correct position.
Final Thoughts
Building a grip that genuinely fits your hand takes patience and a willingness to test and adjust — but the payoff is a more consistent, repeatable shot cycle. If you're working with a traditional recurve bow, a custom-shaped grip can make a particularly noticeable difference given how much feedback flows through the unassisted hand hold. Take your time with the shaping process, trust the test-fit cycle, and finish with a protective but non-slip oil finish.