Skip to content
 cust@legendarchery.com
 302 503 5767
 Westfield IN 46074

The compound bow has become a popular choice for hunters, target shooters, and archers who compete in competitions. To get the most out of your bow and ensure that you can perform at your best, it's important to set it up properly.
As an archer, having a well-set-up compound bow is crucial for improved accuracy, consistency, and overall archery performance. Whether you're a seasoned pro or a beginner, the tips discussed below will guide you in ensuring your bow is in top condition for optimal results.
The Importance Of Proper Compound Bow Setup
Here are some of the key reasons why it's so important to properly set up your compound bow:
Improved Performance
A well-set-up bow will perform at its best, providing improved shot accuracy and consistency. Proper bow setup helps ensure that the bow's limbs and cams work together seamlessly, resulting in a smoother, more efficient shot. This can make a significant difference in your overall archery performance.
Better Comfort
Another important benefit of proper bow setup is improved comfort. When your bow is set up correctly, you'll be able to shoot for longer periods of time without experiencing fatigue, which can greatly enhance your archery experience.
Increased Safety
Correctly setting up your bow is also important for safety reasons. Improperly set up bows can cause the string to snap or the bow to malfunction, which can result in injury to the shooter or others. By setting up your bow correctly, you'll reduce the risk of bow failure and other dangerous malfunctions, making it safer to shoot.
Prolonged Bow Life
Proper bow maintenance and setup can also help to extend the life of your bow. By keeping your bow in good condition, you can help to prevent damage and wear, which can lead to costly repairs or the need to replace the bow altogether.
Step-by-Step Guide for Proper Compound Bow Setup
Below are useful tips to simplify the process of setting up your compound bow:
Choose The Right Bow
The first step in setting up your compound bow is to select the right bow for you. Consider factors such as your body size, draw weight, and draw length to ensure that you get a bow that fits you well. A bow that's too short or too long will be difficult to shoot accurately.
You can visit a local archery shop or find online resources to help you determine the right bow for you. It's also essential to consider the type of archery you'll be participating in, as there are different types of bows for different types of archery. For example, hunting bows are designed for bow hunting and will have different specifications compared to a bow designed for 3D archery or target archery.
Install The Bowstring

The bowstring is a crucial component of the bow and must be installed correctly. Make sure you select the right bowstring for your bow and follow these steps during the installation process:
- Remove the old string.
- Install the new string, following the instructions carefully. There are many types of strings available, and the right one for you will depend on the type of archery you'll be participating in and your personal preference. Consider using a bow stringer when stringing or unstringing your bow.
- Check the string tension to ensure it is tight enough. A loose string can cause problems with accuracy, so make sure it is tight enough before shooting.
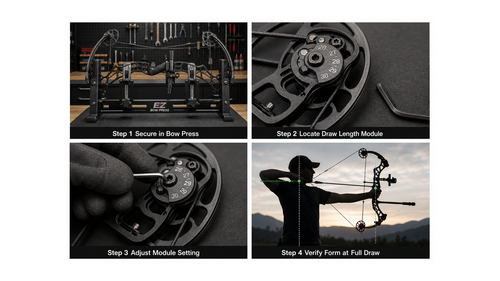
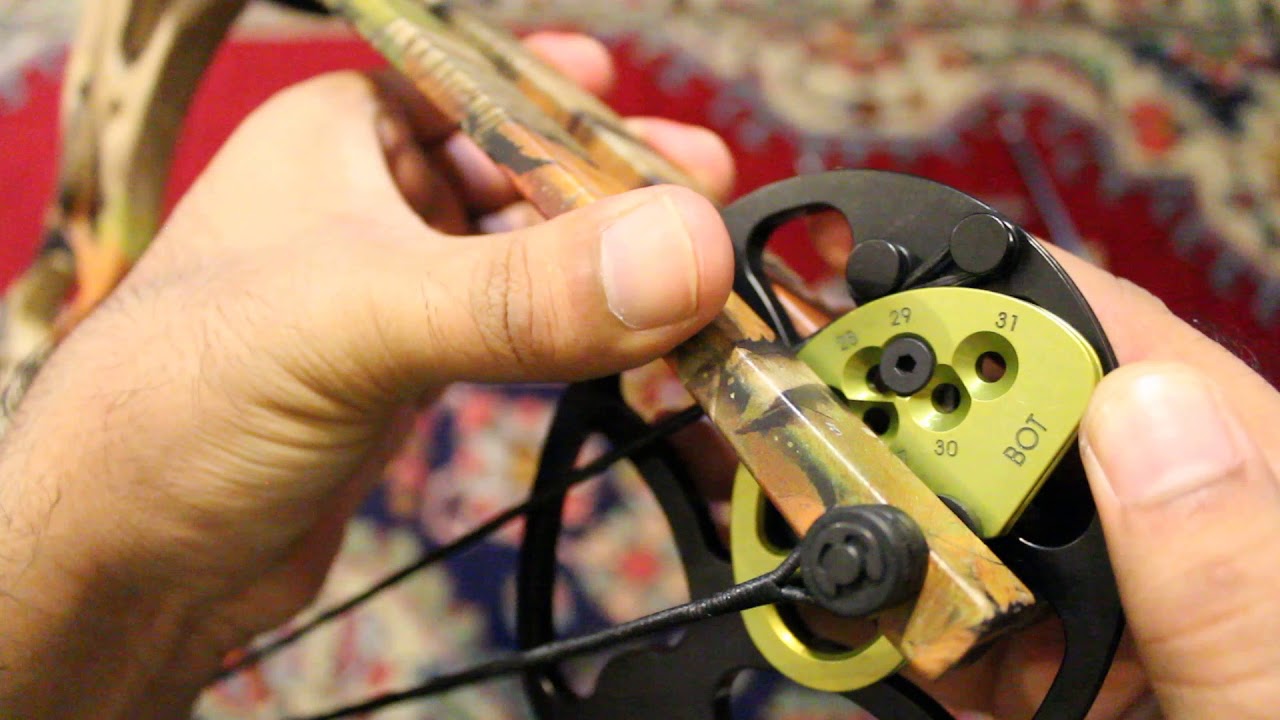
Adjust The Draw Length
The draw length is the distance between the bow's grip and the string when you are at full draw. Having the correct draw length helps to increase accuracy and comfort when shooting. A draw length that's too short or too long can make it difficult to shoot accurately, so it's important to ensure you get the right length.
A compound bow usually have adjustable draw lengths, which can be adjusted by changing the position of the cam system or by changing the length of the bow's modules. Make sure you adjust the draw length so that it's comfortable for you to shoot.
To do this, follow these steps:
- Loosen the limb bolts using a wrench.
- Move the limbs to the appropriate position to achieve the desired draw length. The average for an adult is around 28 inches, but this can vary based on your body size and type of archery you'll be participating in.
- Tighten the limb bolts back in place using a wrench, making sure they are tight enough to secure the limbs in place but not so tight that they cause damage to the bow.
Adjust The Draw Weight

The draw weight is the amount of force required to draw the bow. A bow with the right weight will help you shoot accurately and comfortably. To adjust the draw weight, follow these steps:
- Make sure the bow is unstrung.
- Locate the bow's limb bolts and loosen them.
- Adjust the limb bolts in the desired direction to increase or decrease the draw weight.
- To increase the bow weight, turn the limb bolts clockwise.
- To decrease the bow weight, turn the limb bolts counter-clockwise.
- Tighten the limb bolts evenly and in a cross-pattern, alternately tightening each bolt a few turns until both bolts are tight.
- String the bow and test the draw weight.
- Repeat the adjustment and testing process as necessary until the desired draw weight is achieved.
- Also, make sure to check the bow's overall tension and make any necessary adjustments.
Adjust The Bow’s Let-Off
The let-off of a compound bow refers to the amount of weight that is taken off the bow's limbs when the string is drawn back. It is usually expressed as a percentage and is adjustable on most compound bows. A higher let-off percentage means that less weight is being held at full draw, making it easier to hold the bow steady for a longer period of time. This makes it easier to hold the bow steady for an extended period, which is important for hunting and target archery.
To set the let-off on your compound bow, follow these steps:
- Consult the bow's manual or visit a bow shop for instructions specific to your bow model.
- Adjust the let-off using the cam system on your bow. Loosen the limb bolts and adjust the cable stop until you reach the desired let-off percentage.
- Check the let-off by drawing the bow to full draw and holding it steady. The let-off should be set correctly when you are able to hold the bow steady without experiencing excessive fatigue.
- Make sure to tighten the limb bolts securely after making the adjustment.
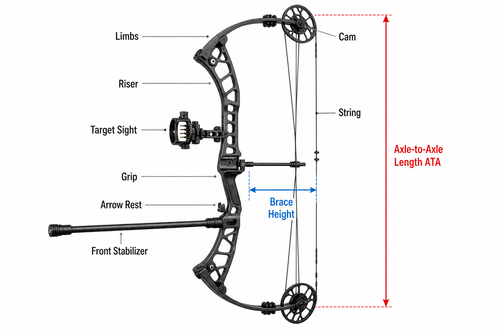
Set The Cam Timing
The cams are the wheels on your bow that control the bow's draw weight and length. Cam timing refers to the relationship between the position of the string and the position of the bow's cams at full draw. Proper timing ensures that the string and cables move evenly and smoothly during the shot cycle while improper timing can lead to accuracy problems and damage to the bow. The timing of a compound bow's cams can be adjusted to optimize performance for a specific archer or shooting situation.
To set the cam timing on a compound bow, follow these steps:
- Ensure the bow is unstrung.
- Locate the timing marks on the bow's cams.
- Align the timing marks on the top and bottom cams so that they are in the same position.
- Re-string the bow and test the cam timing by pulling back on the string to the fullest draw.
- Observe the position of the string and cams to determine if the timing is set correctly.
- Repeat the adjustment and testing process as necessary until the desired timing is achieved.
- Make sure to double-check the overall bow tension and make any necessary adjustments.
Note: This setting requires precise adjustments, and it is recommended to have a bow technician perform this process if you are not familiar with it.
Install The Bow Limbs
The limbs are the pieces of your bow that store energy when you draw the bow. It's important to install the limbs correctly so you can shoot accurately, as they play a crucial role in the bow's overall performance. To install the limbs, follow these steps:
- Make sure the bow is unstrung, and the limb bolts are loose.
- Place the bow handle on a flat surface with the limb pockets facing up.
- Place the limb in the pocket and align the bolt holes with the holes in the pocket.
- Insert the limb bolt through the hole in the pocket and the hole in the limb, and tighten the bolt using a limb bolt wrench.
- Repeat steps 3 and 4 for the other limb.
- Tighten the limb bolts evenly and in a cross pattern, alternately tightening each bolt a few turns until both bolts are tight.
- Test the bow for proper limb alignment and overall tension.
Set The Peep Height
The peep on a compound bow is a small circular aperture that aligns with the string and provides a reference point for aiming. The size and placement of the peep sight can affect the accuracy and consistency of your shots. You want to have your peep sight installed such that it's at the correct level for your eye. To adjust the peep sight, you can use a peep sight alignment tool and bow press to adjust the height and position of the peep sight. You want to ensure the peep sight is high enough to allow you to see through it comfortably but not so high that it affects your shot.
To set the peep sight on your compound bow, follow these steps:
- Determine the correct size and placement based on your draw length (by drawing the bow to your anchor point) and shooting style.
- Adjust the peep sight's position on the string so that it aligns with the bow's sight pins.
- Check the alignment of the peep sight with the bow's sight pins to ensure that it is set up correctly.
- Tighten the string back in place.
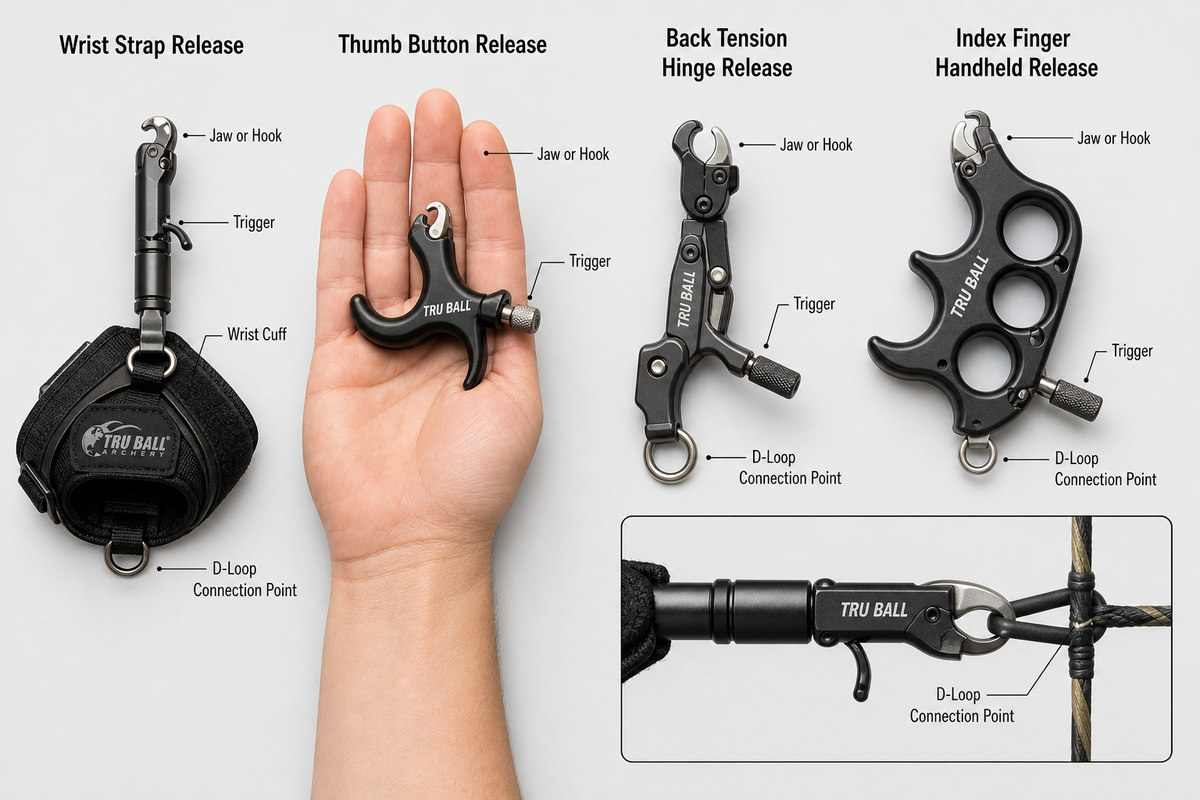
Install The D-Loop
The D-loop is a small loop of string commonly installed on the string that allows archers to easily attach their mechanical release aids. D-loops attach to the string and remove unnecessary pressure, preventing wear and tear and ensuring the arrow is not pressured or twisted by the string at full draw. To install the D-loop, follow these steps:
- Choose the appropriate size D-loop for your string and bow model.
- Clean the area where the D-loop will be installed, removing any dirt or debris.
- Melt the end of the string using a lighter or heat tool.
- Carefully thread the melted end of the string through the D-loop and hold the loop in place while the melted end cools and hardens.
- Secure the D-loop in place on the string using bowstring serving material and a serving tool.
- String the bow and test the D-loop for proper alignment and tension.
Fix The Cable Guard Tension
The cable guard on a compound bow helps to reduce cable torque and enhances arrow accuracy. The tension on the cable guard can be adjusted by tightening or loosening the cable guard rod or by changing the position of the cable guard on the bow riser.
To set the cable guard tension on your compound bow, follow these steps:
- Acquire a cable guard tension gauge and a bow press.
- Use the cable guard tension gauge to measure the tension on the string.
- Adjust the cable guard tension using the bow press until the tension is within the recommended range for your bow.
Install The Arrow Rest
The rest is the part of the bow that holds the arrow in place before release. The arrow rest is a crucial component of your bow, as it helps ensure a consistent release of the arrow. Hence, installing the rest correctly is important for accuracy. There are several types of arrow rests available, including drop-away rests, prong rests, and whisker biscuits. Choose the one that works best for you and set it up correctly for optimal performance. To install the rest, follow these steps:
- Choose the appropriate type of arrow rest for your bow and arrow setup.
- Clean the area where the arrow rest will be installed, removing any dirt or debris.
- Attach the arrow rest to the bow's limb or riser using the manufacturer's provided hardware and tools.
- Adjust the arrow rest as necessary to ensure proper alignment and clearance with the string and bow limbs.
- String the bow and test the arrow rest for proper operation and stability.
- Make any necessary adjustments to the arrow rest until it is securely in place and functioning properly.
Sight In Your Bow

Once your bow is set up, it's time to sight it in. This means adjusting your bow's sights so that you're hitting your target exactly where you aim. You can sight in your bow at a range or in your backyard with the aid of a bow press, but make sure to take your time and make small adjustments until you're satisfied with the results. The sight is the device that helps you aim the bow. Installing the sight correctly is important for accuracy. To install the sight, follow these steps:
- Remove the old sight.
- Install the new sight, following the manufacturer’s instructions carefully. Check that the sight bolts are tightened until they are tight enough to secure the sight in place but not so tight that they cause damage to the bow.
- Make sure the sights are level and adjusted to your preferred height before you start shooting.
- Check the sight's alignment and make any necessary adjustments to ensure it is installed correctly.
Nocking Point
The nocking point on a bow is the location on the string where the arrow is secured. The placement of the nock point can affect the accuracy and consistency of your shots.
To set the nocking point on your compound bow, follow these steps:
- Clean the area where the nocking point will be installed, removing any dirt or debris.
- Determine the desired location for the nock point on the bowstring using a T square.
- Use a brass nock set or string loop to attach the nock point at the correct height and angle on the string.
- String the bow and test the nocking point for proper alignment and tension.
- Check the placement of the nock point on the bowstring to ensure that it is consistent and secure.
- Adjust the nocking point as necessary until it is aligned with the bow's rest and the bow's arrow shelf.
Test The Bow
Finally, test your bow to ensure it is set up correctly, and everything is working properly. You can do this by firing a few arrows and checking the accuracy and consistency of your shots. If you notice any issues affecting your arrow's flight, make the necessary adjustments until the bow shoots properly.
Conclusion
By following these step-by-step instructions for proper compound bow setup, you can help to ensure that your bow is shooting accurately, comfortably, and safely. If you're unsure about any aspect of bow setup, it's always a good idea to seek the advice of a professional archery shop or bow technician. They will be able to guide you through the process and ensure that your bow is set up correctly for your specific needs and shooting style. Remember, a properly set up bow can greatly enhance your archery experience and help you to reach your full potential as a compound bow archer.