Skip to content
 cust@legendarchery.com
 302 503 5767
 Westfield IN 46074

If your arrows keep flying inconsistently or drifting up and down at the target, a missing or poorly set nocking point is often the cause. Learning how to tie a nocking point fast and easy is one of the first practical skills every archer should have. This guide is for beginners setting up a new bow and for intermediate archers who want to replace a worn or shifted thread nocking point without visiting a pro shop.
Why a Tied Nocking Point Matters
A nocking point marks the exact spot on the bowstring where your arrow nock sits before every shot. Without a consistent reference point, your arrow angle changes between shots, affecting flight path, grouping, and form feedback. A tied nocking point made from serving thread is a low-cost, reliable option that can be adjusted or replaced quickly, making it ideal for new setups or field use.
Brass clip-on nocking points are popular and fast to install, but a tied thread nocking point is softer on fingers for barebow and traditional shooters, and it can be placed with more precision. Many coaches recommend learning the tied method first because it teaches you exactly where and why the nocking point is positioned.
What You Need Before You Start
Gather these items before you begin. Having everything ready makes the process smooth and prevents you from losing your place.
- Nocking point thread or serving thread — Waxed nylon serving thread in a contrasting colour is easiest to see and work with.
- Bow square or T-square — This is essential for measuring the correct height above the arrow rest. Do not skip this step.
- Scissors or a sharp blade — For trimming the tag ends cleanly after tying.
- Lighter or heat tool — To melt and seal the knot ends on synthetic thread so they do not unravel.
- Marker or tape flag — Optional, but useful for marking your target position on the string before you start tying.
You do not need a bow press for this task. The bowstring stays on the bow throughout the process, which is one reason this method is accessible to archers at any level.
Step-by-Step: How to Tie a Nocking Point
Follow these steps in order. Each one builds on the last, and rushing early steps is the main reason nocking points end up in the wrong place.
Step 1 — Attach Your Bow Square
Clip the bow square onto the bowstring and rest the horizontal arm on the arrow rest or the shelf. Read the measurement at the string. Most setups begin with the bottom of the nocking point sitting between 1/8 inch and 3/8 inch above square, meaning above a true 90-degree angle to the arrow rest. Check your bow's manual or ask your coach for the recommended starting point, as this varies by bow type and shooting style.
Step 2 — Mark the Position
Once you have found the correct height, hold the position with a small strip of masking tape or a pencil mark on the serving. This gives you a reference while your hands are occupied tying.
Step 3 — Cut Your Thread
Cut a length of serving thread roughly 30 to 40 centimetres long. This gives you enough to work with without the thread becoming tangled. Thread that is too short makes finishing the knot difficult.
Step 4 — Start the Wrap
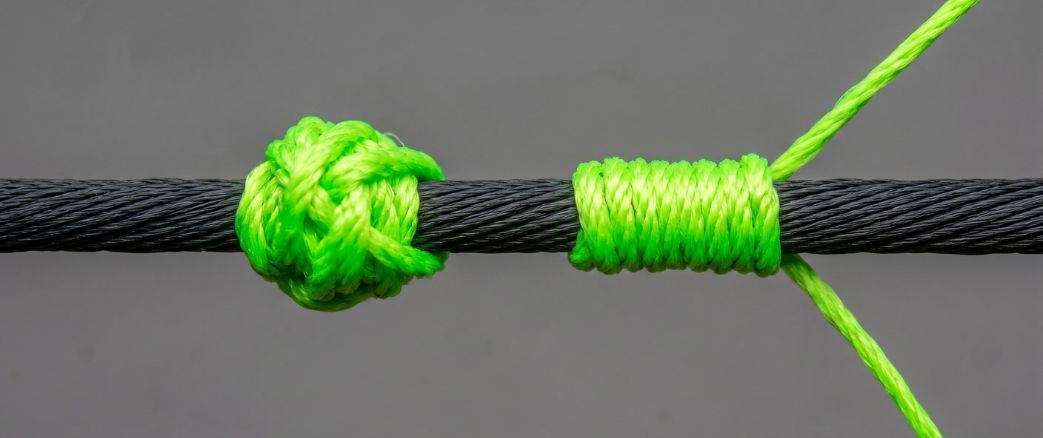
Lay the thread across the bowstring at your marked position, leaving a short tag end of about 3 to 4 centimetres pointing upward. Begin wrapping the long end of the thread around the bowstring, moving downward from your mark. Keep each wrap tight and snug against the previous one. Aim for five to eight wraps depending on thread thickness.
Step 5 — Lock the Wraps
After completing your wraps, pass the working end of the thread back through the loop formed by the first wrap, or tie a simple overhand knot against the last wrap to lock everything in place. Some archers use a series of half-hitches for extra security. Pull firmly so the knot seats tightly against the serving.
Step 6 — Trim and Seal
Trim both tag ends close to the knot with scissors, leaving about 1 to 2 millimetres. Briefly touch the trimmed ends with a lighter flame to melt the synthetic fibres into a small bead. Do not burn the bowstring itself — work quickly and keep the flame moving. This step prevents the knot from working loose over hundreds of shots.
Step 7 — Verify Position
Re-attach the bow square and confirm your nocking point is still at the correct height. The process of tying sometimes shifts the position slightly, especially for beginners. Adjust now rather than after shooting.
Common Mistakes to Avoid
- Skipping the bow square — Eyeballing the position produces unreliable results. Always measure.
- Wrapping too loosely — A loose nocking point shifts during shooting. Each wrap should be tight enough that the thread does not slide when you pull it.
- Using too little thread — A nocking point that is too thin compresses under nock pressure and moves. Build it up with enough wraps to feel solid.
- Burning the string — Holding the flame too long or too close damages the bowstring fibres. Seal quickly with the tip of the flame only.
- Not checking after tying — Always re-measure before shooting. A small shift during tying is common and easy to fix at this stage.
- Placing the nocking point below square — This is a common beginner error. The nocking point almost always sits above square, not at it or below it.
How to Check Your Result
A well-tied nocking point should pass a few simple checks before you shoot.
First, try to slide it up and down the string with firm finger pressure. It should not move at all. If it slides, the wraps are too loose and you need to redo the tying stage.
Second, nock an arrow and confirm the nock clicks into place just below the nocking point with a satisfying snap. The arrow should sit at a slight downward angle from nock to tip when rested on the arrow shelf — this is normal and expected in most setups.
Third, shoot three to five arrows at close range and then re-check the position with the bow square. If the nocking point has crept even slightly, the knot needs reinforcement. A properly finished nocking point stays in place through extended shooting sessions without re-adjustment.
Understanding arrow nocking technique also plays a role here — even a perfectly placed nocking point will not help if the arrow is being seated incorrectly before each draw.
When to Replace or Adjust Your Nocking Point
Check your nocking point whenever you notice your arrows grouping higher or lower than usual without any change in your form or anchor point. Thread nocking points wear over time and can compress, fray, or shift. Replacing them is quick once you have done it a few times — many experienced archers carry spare thread and a bow square in their kit for exactly this reason.
If you are switching between arrow types, changing rest height, or getting a bow tuned, always re-set the nocking point as part of the process rather than assuming the old position is still correct.
Frequently Asked Questions
How tight should a tied nocking point actually be?
Tight enough that you cannot shift it with firm finger pressure on the string. If you can move it at all, the wraps need to be redone. A properly tied nocking point should feel like part of the string, not like something sitting on top of it.
What is the best thread to use for a tied nocking point?
Waxed nylon serving thread in a weight matched to your string diameter works well for most setups. It grips the string, is easy to seal with heat, and is widely available. Some archers use heavier braided thread for a thicker nocking point that is easier to feel in low-light conditions.
Can I use two nocking points instead of one?
Yes. Using both an upper and a lower nocking point is common in Olympic recurve and compound setups. The lower nocking point sits just below the arrow nock and prevents the nock from riding up on the draw. If you add a lower point, place it first, then set the upper point at your desired height above square.
How do I know if I set the height correctly?
Start at the standard recommendation for your bow type — usually 1/4 inch above square for recurve — and shoot a test group. If arrows consistently tail-high or tail-low in flight, small height adjustments may be needed. Paper tuning or bare shaft testing gives you more reliable feedback than visual inspection alone.
Final Notes
Tying a nocking point is a foundational skill that takes about ten minutes to learn and less than five minutes to do once you are familiar with the process. The tools are inexpensive, the technique transfers across bow types, and the result directly affects your consistency at every distance. If you are setting up a new bow, this is one of the first adjustments to make before you start tuning anything else.