Skip to content
 cust@legendarchery.com
 302 503 5767
 Westfield IN 46074

If you shoot at home, a proper target and backstop setup is not optional — it is the difference between a functional practice space and a safety hazard. This guide covers everything you need to build a DIY target and backstop for your home range, from choosing materials to checking your final setup before you shoot the first arrow.
Why a Purpose-Built Backstop Actually Matters
A bare target with nothing behind it is only as reliable as your worst shot. Arrows pass through worn targets, miss the face entirely during poor sessions, or skip off at angles. A backstop catches those arrows before they travel further than intended. Beyond safety, a well-built backstop also protects arrows from damage, reducing the cost of broken or bent shafts over time. If you share a property with neighbors or have foot traffic nearby, a solid backstop is non-negotiable.
What You Need Before You Start
Before cutting or building anything, get three things sorted:
- Confirmed shooting lane distance: Measure your available space. Most backyard setups work between 10 and 30 meters. Know your lane length before sizing your backstop.
- Local regulations: Some municipalities restrict archery discharge in residential areas. Check local bylaws before building anything permanent.
- Your bow type and draw weight: A 20 lb youth recurve and a 70 lb compound bow demand very different backstop materials. Understand what your equipment is capable of before selecting materials.
Tools Required
- Measuring tape and chalk line
- Circular saw or hand saw (for lumber framing)
- Drill and screws or exterior nails
- Staple gun or heavy-duty zip ties (for securing backstop fabric)
- Post hole digger or concrete mix (if mounting posts permanently)
- Level
- Work gloves and eye protection
Materials for the Target
The most practical DIY archery targets use one of these core materials:
- Compressed foam: Stacked layers of carpet foam, upholstery foam, or closed-cell foam sheets work well for field points. They stop arrows cleanly and allow easy removal.
- Tightly packed fabric: Old denim, canvas, or burlap stuffed into a mesh bag or wooden frame creates a dense, inexpensive target. This is sometimes called a rag bag target.
- Hay bales: An old-school option that works best for lower draw weights. Hay degrades over time and can harbor moisture, so plan for replacement.
If you want a ready-made option to compare your build against, browsing an archery target selection gives you a useful reference point for density, thickness, and stopping power.
Materials for the Backstop
- Ballistic nylon or rubber-backed cargo netting: Stops most arrows that miss the target without destroying them.
- Stacked rubber mats or conveyor belting: Extremely durable but heavy. Works well for permanent installs.
- Compressed foam panel: A large sheet of high-density foam behind the target can serve double duty as both backstop and secondary stopping layer.
Step-by-Step Build Process
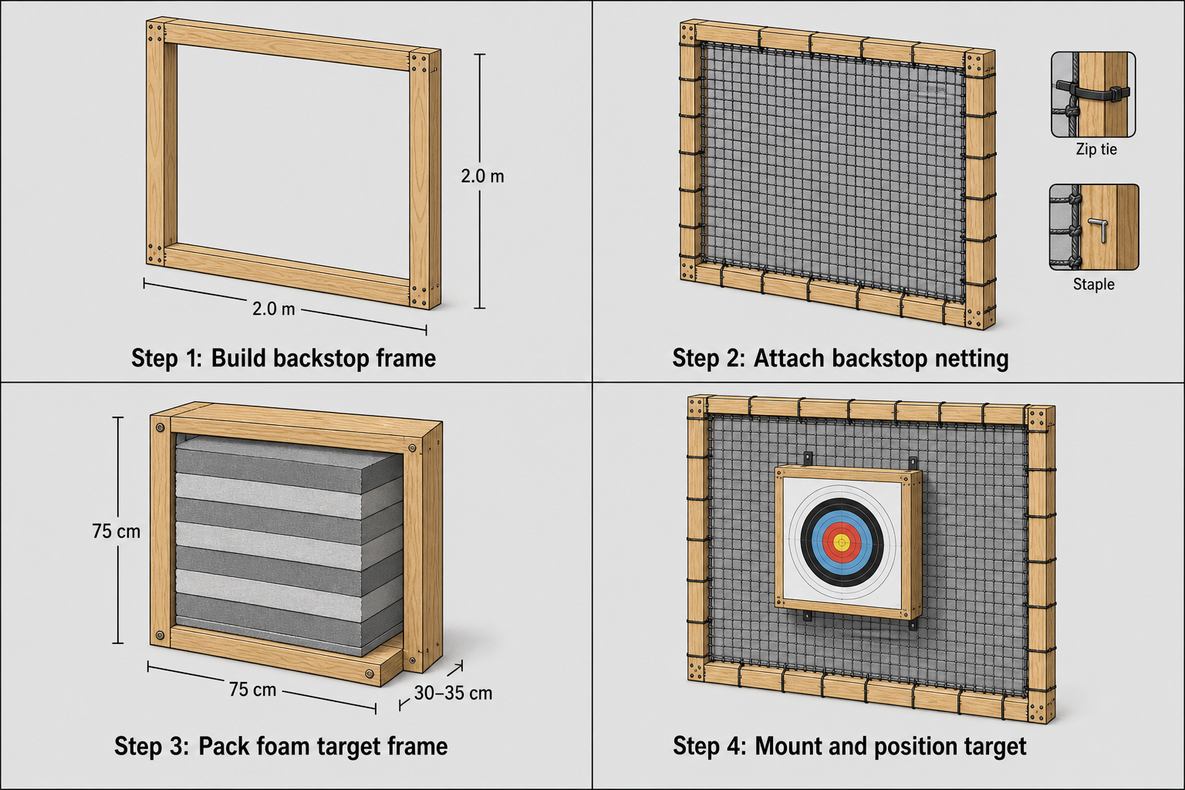
Step 1 — Frame the Backstop
Build a simple rectangular frame using 2x4 or 4x4 lumber. Standard backstop frames for home ranges are typically 1.5 to 2 meters wide and 1.5 to 2 meters tall. Use exterior-grade lumber if the structure will be exposed to weather. Secure corner joints with wood screws rather than nails for long-term stability. If you are mounting it freestanding, drive posts at least 60 cm into the ground or use a concrete anchor for each post.
Step 2 — Attach the Backstop Material
Stretch your chosen backstop material across the back of the frame. For netting or fabric, use a staple gun along the outer edges, then reinforce with zip ties through the frame every 20 to 30 cm. For rubber mats or foam panels, fasten them flat against the frame using large washers and screws to distribute pressure across the surface and prevent tearing.
Step 3 — Build the Target Frame
Construct a smaller secondary frame in front of the backstop to hold your target material. A 60 x 60 cm to 90 x 90 cm inner frame works for most home setups. This can be as simple as four pieces of 2x4 lumber screwed into a square. Leave an open back so you can stuff or replace the target material easily.
Step 4 — Pack the Target
For a foam target, stack layers of cut foam tightly inside the frame, alternating grain direction if using closed-cell foam. For a rag bag target, compress fabric as tightly as possible before closing the bag. The denser the pack, the better the stopping performance and the cleaner the arrow removal. Loose packing leads to deep arrow penetration and difficult extraction.
Step 5 — Mount and Position the Target
Fix the target frame to the front of the backstop frame using screws or bungee cords if you want it removable. Center the target at a height appropriate for your practice style — typically eye level or slightly below when standing at your shooting position. An archery target stand can also work here if you prefer a freestanding or adjustable front frame rather than a fixed one.
Step 6 — Check the Shooting Lane
Walk the full distance from your shooting position to the target. Confirm there are no overhead obstructions, trip hazards, or bystander paths crossing the lane. Mark your shooting line clearly with tape or a ground stake. Ensure the backstop has sufficient clearance above and on both sides of the target for missed shots.
Common Mistakes to Avoid
- Undersizing the backstop: A backstop that is only slightly larger than the target face leaves no margin for misses. Make it noticeably wider and taller than the target itself.
- Using single-layer materials: One layer of fabric or a single thin foam sheet will not stop a fast arrow reliably. Always use depth — multiple layers or dense packing.
- Skipping ground anchoring: A frame that tips or shifts in wind becomes a safety issue. Anchor it properly from day one.
- Ignoring UV and moisture degradation: Outdoor backstops break down over time. Check your materials seasonally and replace anything that is crumbling, thinning, or losing tension.
- Mounting the target too close to the ground: Low targets increase ricochet risk. Keep the center of the target at a practical height with clear space below.
- Not accounting for arrow pass-through: Some lighter materials stop arrows on contact but let them pass through slowly as the material wears. Inspect your target after every few sessions.
How to Check Your Setup Before Shooting
Before putting your first arrow downrange, run through this quick checklist:
- Push the backstop frame firmly — it should not wobble or shift.
- Press your palm flat against the target material — you should feel significant resistance, not easy compression.
- Stand at your shooting position and visually confirm the full backstop is visible beyond the target edges.
- Check that no structures, fences, or surfaces are directly behind the backstop at arrow height.
- Do a dry-run walk of the full shooting lane at ground level looking for anything that could deflect an arrow sideways.
After your first session, pull all arrows and inspect the target face and backstop surface for pass-through damage or significant wear. Address any issues before shooting again.
Frequently Asked Questions
What is the most important thing to get right when building a home archery backstop?
Depth and density of the stopping material. A backstop that looks solid but has loose or thin internal layers will fail under repeated use, especially with heavier draw weights. Build in more material than you think you need.
What mistakes do people most often make with DIY targets?
Packing the target too loosely is the most common one. The second is building the backstop the exact same size as the target face, leaving no margin for off-center shots. Both issues are easy to fix at the build stage and difficult to correct after the fact.
Do I need special tools to build a basic home range setup?
No specialized tools are required. A saw, drill, staple gun, and measuring tape handle most of the work. The materials themselves — lumber, foam, netting — are widely available at hardware stores and do not require custom cutting equipment.
How do I know if my backstop is actually stopping arrows safely?
After each session, check whether any arrows penetrated further than the first third of your target depth. If arrows are reaching the backstop layer consistently, your target material is too thin or too loose and needs rebuilding. The backstop itself should show no arrow impacts during normal use — if it does, the target is failing.
Final Thoughts
A well-built home range setup does not need to be expensive or complicated, but it does need to be done correctly. Take the time to size your backstop properly, pack your target densely, and anchor everything before you shoot. Regular inspection keeps the setup reliable over many sessions. If you want to compare your DIY work against commercial options or supplement it with a purpose-built target face, Legend Archery carries a range of targets and stands worth reviewing as reference points.