Skip to content
 cust@legendarchery.com
 302 503 5767
 Westfield IN 46074

Most archers plateau not because they lack talent, but because they practice the wrong things. Shooting arrow after arrow at a target without structure reinforces existing habits — good and bad. Structured drills, on the other hand, isolate specific mechanics and force genuine improvement. Here are four practical shooting drills that address the fundamentals most archers need to work on.
Why Structured Drills Matter More Than Volume
Shooting a high volume of arrows is easy. Shooting with intention is harder. When you repeat a flawed motion hundreds of times, that flaw becomes deeply ingrained. Drills work differently — they shrink the feedback loop, make each shot deliberate, and give you something specific to evaluate after every release.
The four drills below are used by coaches and experienced archers across recurve, compound, and traditional disciplines. Each one targets a distinct part of the shot cycle. Work through them in order or isolate the one that matches your current weakness.
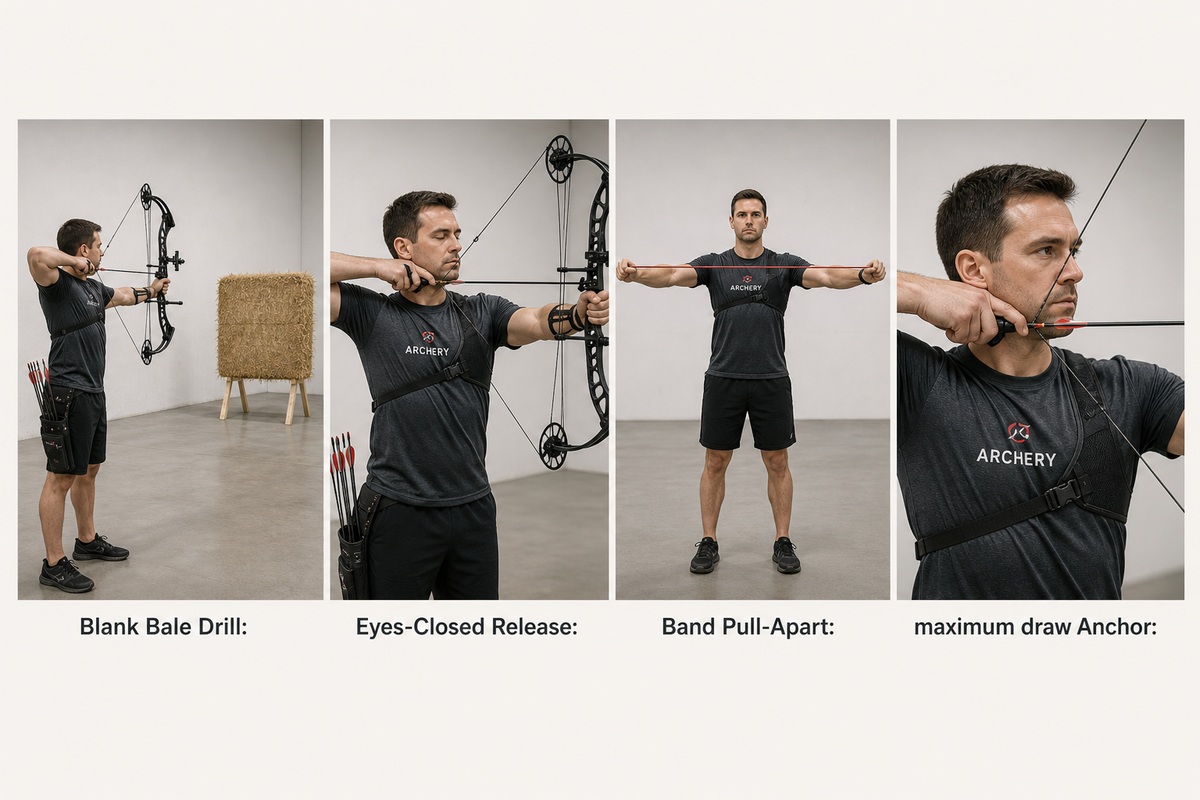
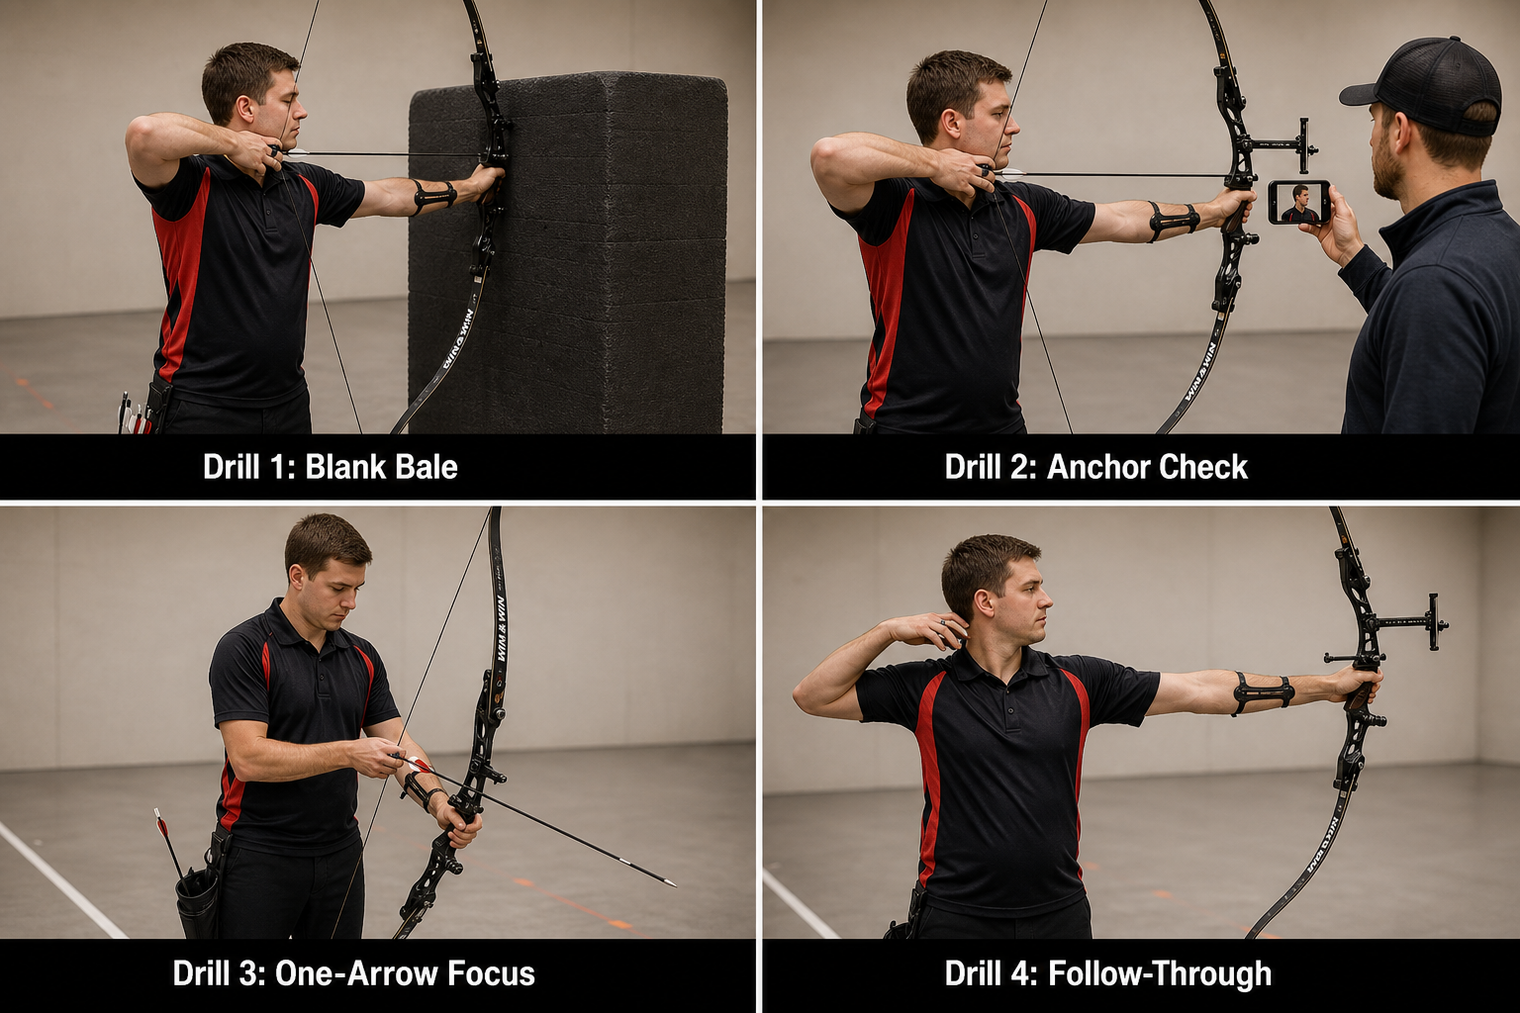
Drill 1: Blank Bale Shooting for Shot Process
Blank bale shooting means standing a few feet from a plain foam bale — no target face, no scoring rings — and shooting with your eyes either closed or focused on nothing in particular. It sounds simple. It is one of the most effective tools in archery training.
Without a target to aim at, your brain stops fixating on where the arrow lands and starts paying attention to how the shot actually feels. You notice whether your draw hand is pulling straight back, whether your bow arm is stable, and whether you are collapsing the shot early out of anticipation.
How to run the drill
- Stand three to five feet from the bale. Distance is irrelevant here.
- Close your eyes after settling your sight picture or instinctive aim.
- Draw, anchor, and execute the shot entirely by feel.
- After the release, hold your position and mentally assess: Did I collapse? Did my bow arm drop before the arrow left the string? Did I punch the trigger or creep the tab?
- Shoot ten to fifteen arrows per session this way before moving to a target.
The blank bale is particularly powerful for archers dealing with target panic, because it removes the stimulus that triggers the flinch response.
Drill 2: The Anchor Point Consistency Check
An inconsistent anchor point is responsible for a significant portion of vertical dispersion — arrows grouping high on some shots and low on others. Your anchor needs to be the same tactile reference every single time you draw the bow.
This drill uses a mirror or a training partner with a camera to give you real-time visual feedback on your anchor position.
How to run the drill
- Draw to your anchor and hold for five seconds without releasing.
- Have a partner photograph or video the side profile of your face and draw hand at full draw.
- Review the image and look for: consistent contact points between string and face, draw hand thumb position, and head tilt.
- Repeat ten times and compare images across the set.
- Identify any variation and consciously address it on the next set.
Wearing proper shooting gloves that fit correctly is worth mentioning here — a tab or glove that bunches or slips subtly changes where your fingers sit on the string, which directly affects your anchor. Equipment consistency matters as much as physical consistency.
Drill 3: The One-Arrow Drill for Mental Focus
Shooting ends of six or ten arrows encourages a relaxed, sometimes careless rhythm. When you know five more arrows are coming, it is easy to dismiss a poor shot and move on. The one-arrow drill eliminates that escape.
You nock one arrow, walk up to the shooting line, and treat that single arrow as if it is the only one you will shoot all session. Then you step back, reset mentally, and repeat.
How to run the drill
- Nock one arrow and approach the line with a clear pre-shot routine in mind.
- Execute your full shot process with complete attention.
- Walk back to your bag, note what you felt during the shot, then retrieve your arrow.
- Repeat for a total of ten to fifteen arrows, treating each one as standalone.
This drill builds the kind of focus you need in competition, where each arrow carries real weight. It also forces you to develop a pre-shot routine because you cannot rely on the momentum of an end to carry you through.
Drill 4: Follow-Through and Relaxation Training
Many archers release the shot and immediately drop their bow arm, peek around the sight, or open their bow hand — all before the arrow has cleared the rest. These are forms of anticipation, and they introduce torque and movement at the worst possible moment.
This drill trains you to maintain your position through the entire shot, not just to the point of release.
How to run the drill
- After releasing the shot, freeze your entire body and count silently to three.
- Your bow arm should remain raised and your draw hand should finish at or near your ear or shoulder, wherever it naturally travels after release.
- Only after that three-count do you lower the bow.
- Have a partner watch your bow arm and draw hand to confirm you are not anticipating the shot by moving early.
Follow-through is not a passive afterthought. It is the physical proof that you were relaxed and committed throughout the entire shot. If your bow arm drops the instant you release, your muscles were already moving before the string left your fingers.
Exploring outdoor archery supplies that support your training setup — from proper targets to training aids — can help you run these drills more effectively in a backyard or field range environment.
Common Mistakes When Using These Drills
- Rushing through blank bale work. Archers often treat it as a warmup and shoot too quickly. Each blank bale shot should be as deliberate as a scored end.
- Skipping the review step. Drills only work when you assess what happened. Shooting without reflection is just practice in disguise.
- Doing all four drills in one session. Pick one or two per session and give each the attention it needs. Overloading yourself produces mental fatigue, not improvement.
- Only drilling when something is broken. These drills are most effective as preventive maintenance, not emergency repairs. Build them into your regular sessions.
- Ignoring equipment fit during drills. If your gear does not fit properly — glove slipping, sight picture obscured, draw length off — the feedback from your drills is corrupted before it starts.
Frequently Asked Questions
Do I need special equipment to run these drills?
No. All four drills can be done with your existing bow, arrows, and a standard foam bale. The anchor point drill benefits from a camera or mirror, and the follow-through drill is more effective with a training partner watching. Beyond that, no special tools are required.
How often should I practice these shooting drills?
Incorporating one or two of these drills at the start of each range session — before you move into scored shooting — tends to produce the most consistent improvement. Two to three focused sessions per week with deliberate drill work will outperform five sessions of unstructured shooting.
I shoot compound. Are these drills still relevant?
Yes. The blank bale drill, anchor consistency check, one-arrow drill, and follow-through training all apply directly to compound shooting. The specific mechanics differ slightly — back tension release versus index finger trigger, wrist sling versus grip — but the underlying principles of repeatability and shot process discipline are universal across all bow styles.
What's the biggest mistake beginners make with structured drills?
Treating the drill as a checkbox rather than a diagnostic tool. The point is not to complete the drill — it is to learn something from each shot within the drill. Beginners often rush through blank bale work or skip the post-shot review, which removes most of the training value.
Putting It Together
Improving as an archer is less about shooting more and more about shooting smarter. These four drills — blank bale, anchor consistency, one-arrow focus, and follow-through training — each address a different layer of the shot process. Used consistently, they build the kind of repeatable mechanics that hold up under pressure. If you are looking to refresh your training gear or equipment alongside your practice, browse Legend Archery's range of new archery products to support your setup.